Blog

You press start, the light comes on, the turntable spins, and the fan hums its familiar tune. The timer counts down perfectly to zero. But when the beep sounds and you open the door, your food is exactly as cold as it was when you put it in. This is the "Runs But No Heat" failure, and it is the single most frustrating issue for homeowners because the appliance appears to be working perfectly.
If your microwave is running but not heating, it is a baffling problem. How can an appliance seem to work perfectly—lights, fans, and motor all functioning—yet fail to do the one thing it was built for?
This specific issue is the single most common repair scenario we encounter. The good news is that it rarely means your microwave is completely dead. To understand why this happens, you have to look at the anatomy of the machine. Your microwave is essentially two appliances in one box. First, there is the Low Voltage Circuit, which powers the "user experience" parts like the digital display, the turntable motor, and the interior light. Second, there is the High Voltage Circuit, a dangerous and powerful system responsible for generating the actual microwave energy.
This guide follows a strict professional diagnostic flow, moving from the simplest "User Error" fixes (like those found in Whirlpool's service manuals) to the complex component testing found in technician diagrams. We will walk you through the 6 common causes, and determine if your unit is worth saving.
Before we discuss tools or testing, we must address the lethal reality of microwave repair. Unlike a dryer or a toaster, a microwave oven stores a massive electrical charge even after it is unplugged. The High Voltage Capacitor is designed to hold roughly 2,000 to 4,000 volts of electricity to help kickstart the magnetron. This energy does not simply disappear when you pull the plug; it can remain stored for days, waiting for a path to ground—which could be you.
The danger is real: a capacitor discharge at 2,000 volts can induce ventricular fibrillation—an irregular heartbeat that leads to cardiac arrest. Even a brief contact with a charged capacitor can be fatal. The voltage is far beyond what the human body can tolerate; any current path through the chest at this voltage can stop your heart. If you plan to open the cabinet for internal testing, you must perform a "Capacitor Discharge."
Step-by-Step Discharge Procedure:
1. Unplug the unit completely from the wall outlet.
2. Wear protective gear, specifically rubber-soled shoes and heavy rubber-insulated gloves.
3. Prepare your tool: Use a pair of pliers with heavily insulated rubber handles (rated for high voltage). If you only have a screwdriver, wrap the handle in electrical tape or insulation.
4. The Discharge: Touch the metal tips of the pliers to both terminals of the capacitor simultaneously to create a short circuit.
5. The Sound: You may hear a loud "POP"—that is the sound of stored energy releasing safely.
6. Verification: Repeat the touch test to ensure no residual charge remains. Touch the terminals again; if you hear another pop, repeat until silent.
If you are uncomfortable with this step, do not proceed to the internal repairs. At that stage, it is safer to contact a professional microwave repairs service to handle the high-voltage components)
Before you unscrew the case, we need to rule out the "Ghost Errors." These 5 steps solve roughly 30% of "No Heat" calls without using a single tool.
1. The "Power Reset" (Whirlpool Fix #1) Modern microwaves are controlled by complex digital logic boards. Like a computer, these boards can freeze or glitch after a minor power surge or brownout. If the logic board hangs, it may run the timer but fail to send the "Fire" signal to the magnetron.
Why This Happens: Your microwave's low-voltage control board contains small electrolytic capacitors that store power to keep the logic circuits alive. When a power surge hits or the breaker trips, these capacitors can sag or become unstable, causing the board to enter a state where the display works but the relay controlling the high-voltage circuit never engages. This is identical to what happens when a computer freezes but the monitor stays on.
The Fix: Unplug the microwave from the wall outlet and leave it disconnected for a full 5 to 10 minutes. If the plug is hard to reach, flip the circuit breaker off at your electrical panel. This drains the residual power from the small capacitors on the control board and clears the logic.
What to Expect: After 10 minutes, plug it back in. If the problem was a board glitch, the microwave will heat normally on the first test. If it doesn't, move to the next fix.
2. Check for "Demo Mode" (Whirlpool Fix #2) If you recently bought your microwave, or if it lost power during a storm, it may have reverted to "Demo Mode" (also known as Shop Mode). This feature is used in retail stores to allow customers to press buttons and see the display work without turning on the dangerous magnetron. In Demo Mode, the timer counts down and the table spins, but the heater never engages.
● Why Retailers Use This: Demo Mode protects store staff and customers from accidental exposure to microwave radiation while allowing the microwave to appear fully functional. The feature is a built-in safety mechanism that can activate after certain power loss events or specific button sequences.
● Visual Clue: Look at your microwave's display. If there's a small "DEMO," "D," or a store-mode icon visible, this is your culprit.
● The Fix: Consult your manual for the specific button sequence to turn this off. Common sequences involve holding the "0", "Start", or "Power Level" button for 5 seconds until the "Demo" icon disappears. For Whirlpool models, try holding "0" for 3-5 seconds. For GE models, often it's holding "Timer Set" then "Off/Clear." Check the back of your manual's cover for brand-specific codes.
● Pro Tip: If you can't find your manual, search "[Your Brand] [Model Number] demo mode disable" on the manufacturer's website.
3. Verify Power Level Settings (Whirlpool Fix #3) Did you accidentally hit the "Power Level" button? If the microwave is set to Power Level 1 (or 10%), it will run for 90% of the time without generating heat, only pulsing the magnetron briefly.
● How Power Levels Work: Power levels don't change the magnetron's strength—they pulse it on and off. At 100%, the magnetron runs continuously. At 50%, it runs half the time and is off the other half. At 10%, it runs only during short bursts. For frozen food or defrosting, low power is useful. For heating coffee, high power is required.
● The Fix: Ensure you are testing with a cup of water on High / 100% Power. Press the "Power Level" button repeatedly until you see "100%" or "High" on the display, then test. If the water heats now, you found your problem.
● Prevention: Most modern microwaves allow you to set a default power level in the settings menu.
4. The "Delay Start" Trap (Whirlpool Fix #4) Many users mistake the "Kitchen Timer" or "Delay Start" feature for the cooking cycle because it looks identical on the screen. If you set a delay, the fan might run (on some models) or the timer will count down, but no cooking is happening.
● How Delay Start Works: This feature lets you set the microwave to start cooking at a specific time in the future. You might set it to start in 5 hours when you arrive home. During the delay period, nothing cooks—the timer just counts down. When the delay expires, then cooking begins.
● Visual Clue: Look for "DELAY," "Start Time," or a timer icon on the display distinct from the cooking timer.
● The Fix: Cancel all functions and press "Add 30 Seconds" to test immediate cooking. If the water heats now, Delay Start was active.
5. The Door Latch Security Check (Reddit Fix #2) Your microwave has a safety mechanism that prevents radiation from leaking out. If the door isn't closed perfectly, the system might allow the fan to run but will physically cut the power to the magnetron.
● Why This Matters: Microwave radiation is dangerous. The door contains three separate safety switches designed to work together. If even one of these switches doesn't confirm the door is fully closed, the entire high-voltage circuit shuts down automatically—a designed fail-safe, not a defect.
● Visual Clues: If the interior light stays on when you close the door, the switches likely aren't engaging. If the light flickers when you move the door, there's a loose latch.
● The Fix: Open the door and inspect the latch hooks carefully. Are they stuck? Is there dried food debris blocking the hole? Look inside the door frame for a small rectangular opening where the latch hooks insert. Clean this area thoroughly—dried food is a common culprit. Close the door firmly—sometimes a little extra force is needed to engage a worn-out latch. If you hear a definitive "click," the switches engaged.
● Advanced Check: With the door closed, try to lift the door handle upward. A properly latched door should not budge. If it lifts easily, the latch is worn and the switches are not engaging.
If the settings are correct, we move to a physical inspection of the cooking chamber. Look for these three culprits:
The Waveguide Cover Look at the small square or rectangular panel (usually mica or plastic) located on the right or top wall of the interior. Its job is to protect the magnetron from food splatters. If this cover is caked in old grease or carbon buildup, the microwave energy can arc against it, causing sparking and preventing the food from heating.
● Why This Fails: The waveguide is where high-frequency microwave radiation travels from the magnetron into the chamber. If it's blocked or damaged, the waves either reflect back (damaging the magnetron) or don't reach the food efficiently. Grease buildup acts like a conductor, creating electrical arcs instead of allowing waves through.
● What to Look For: Burns, blackening, or a visibly caked coating. If it looks burned, replace it immediately—it's a fire risk and typically costs $10-20.
● Replacement: Most waveguide covers pop or clip out easily. Part numbers vary by brand, so search "[Your Brand] [Model] waveguide cover."
The Door Seals Run your hand along the edge of the door frame. If the seal is loose, warped, or damaged, the safety switches might not engage properly. A gap here is not just a heating issue; it is a safety issue.
Visual Inspection: Look for cracks, tears, or areas where the rubber has compressed unevenly. The seal should form a tight gasket around the entire perimeter of the door.
Why This Matters: A damaged door seal allows microwave radiation to escape, which is both a safety and efficiency issue. Additionally, a poor seal prevents the switches from engaging fully, cutting the heating cycle.
The Fix: If the seal is loose, it may just need cleaning or reseating. If it's torn or permanently compressed, replacement is needed. Seals typically cost $20-40 and are easy to replace by popping out the old one and snapping in the new.
The Turntable Coupling If the tray doesn't spin, the food won't heat evenly. While a broken motor won't stop the heat entirely, it will leave you with hot spots and cold spots, which many users interpret as "not heating."
● Why Rotation Matters: The turntable keeps food moving through the hottest part of the microwave. Without rotation, areas near the magnetron heat rapidly while far corners stay cold. After 2-3 minutes, users assume nothing is heating.
● What to Check: Look under the turntable. The drive coupling is a small plastic or rubber connector that sits on the turntable support hub. If it's cracked, missing, or worn smooth, the turntable won't turn even if the motor is fine.
● The Fix: Flip the turntable out and inspect the underside coupling. If it's damaged, replacements cost $5-15 and take 1 minute to swap. If the turntable still won't spin after replacing the coupling, the motor may be faulty (a $30-50 part that requires opening the unit).
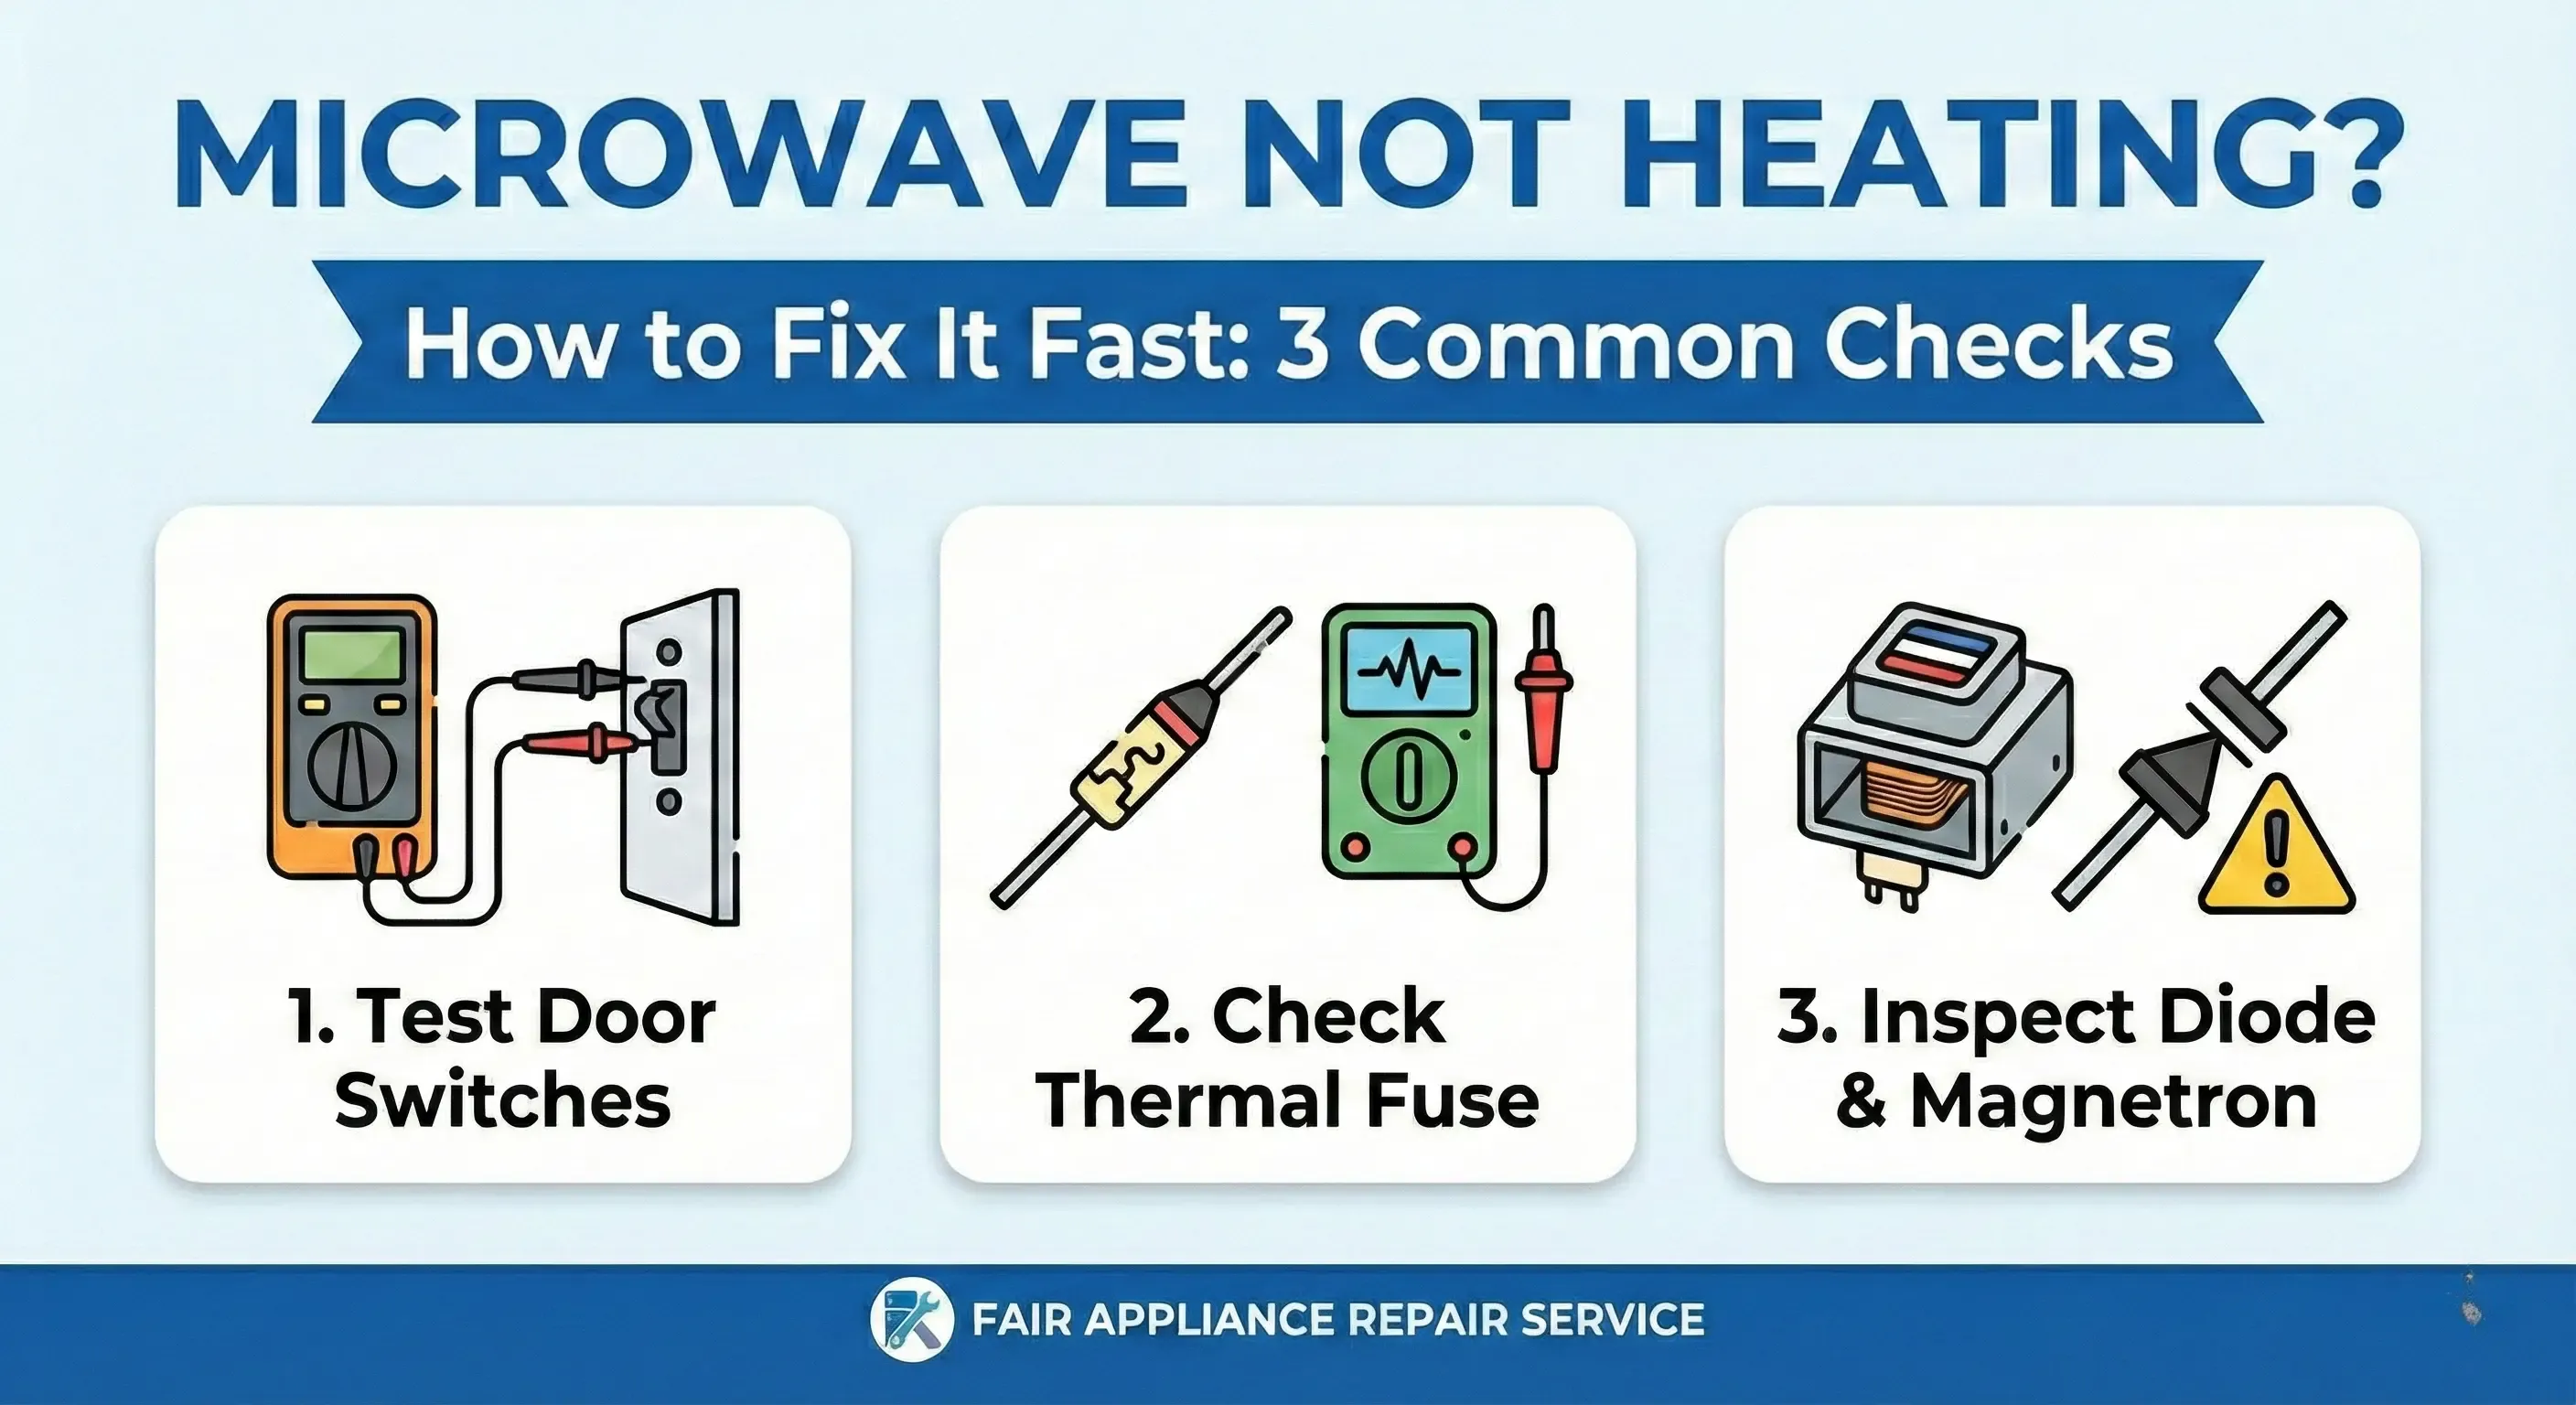
We are now moving into internal diagnostics. This corresponds to the "Door Interlock" section of the repair diagram. The most common mechanical failure in a microwave that runs but won't heat is the Door Interlock Switch assembly. Your microwave typically has three or four of these tiny switches hidden behind the control panel latch. They work in a specific safety sequence:
● Primary Switch: Signals the control board that the door is closed.
● Monitor Switch: A safety fail-safe that shorts the fuse if the door is forced open.
● Secondary Switch: Controls the internal light and fan operation.
How the Safety System Works: When you close the door, the primary switch must engage first. This tells the control board "door is secure." If this signal is weak or intermittent, the control board receives mixed messages: "Allow fan to run, but prevent heating." The magnetron gets cut off automatically by design. If the Primary Interlock Switch is failing, it sends a mixed signal: it tells the control board "The door is closed enough to run the fan," but "The door is open, so cut the high voltage." This results in the classic symptom of a running machine with no heat.
The Continuity Test To test this, you will need a multimeter (available for $10-15 at any hardware store). Set the mode to Continuity (Ohms).
Procedure:
Unplug the microwave completely.
Remove the control panel screws (usually 4-6 screws along the edges). Carefully pull the panel away, revealing the switch assembly.
3. Locate the three switches. Take a photo of the current wiring before disconnecting anything.
4. Unplug the wires from the switch connectors (label them with tape).
5. Set your multimeter to Continuity mode.
6. Test #1 - Door Open: Touch the multimeter probes to the primary switch terminals. You should read "Infinity" or see no beep (switch is open).
7. Test #2 - Door Closed/Button Pressed: Press the switch button (or close the door if possible). The multimeter should beep and read close to 0 Ohms (switch is closed).
8. Result: If the meter remains silent when the button is pressed, that switch is dead and must be replaced.
Replacement Cost: $10-30 per switch. If the primary or secondary switch is bad, replace it immediately. This is one of the most common fixes.
Did your microwave stop heating right after a long cooking session, like defrosting a turkey? Microwaves generate immense heat, and not just in the food. The magnetron itself gets incredibly hot. To prevent fire, manufacturers install a Thermal Cutoff Fuse (or Thermostat). This is usually a small, disk-shaped component roughly the size of a dime, located on top of the magnetron or the metal chassis.
● Why It Blows: If the internal temperature exceeds a safety limit (usually due to a blocked vent fan or old grease buildup preventing airflow), this fuse will "pop." Unlike the main fuse that kills the whole machine, a thermal fuse is often wired specifically to the High Voltage circuit. This means the lights and display stay on, but the magnetron gets zero power.
● The Symptom: Your microwave ran fine yesterday for 30 minutes defrosting chicken. Today, the light and turntable work, but no heat. This is a classic thermal fuse failure.
1. Unplug the microwave and discharge the capacitor (see safety section).
2. Remove the cabinet or access panel to locate the thermal fuse (usually near the magnetron or on the transformer).
3. Set your multimeter to Continuity mode.
4. Touch the probes to both ends of the fuse.
5. Result: A working fuse will have continuity (0 ohms, multimeter beeps). A blown fuse will show no reading (Infinity, multimeter silent).
Replacement Cost: $5-15. This is the cheapest fix and often solves the "runs but no heat" problem instantly. Prevention: After extended cooking sessions, let the microwave cool for 30 minutes before the next use. Keep the vent grille clear of dust.
If the switches and fuses are good, we are now hunting for a component failure. The High Voltage Diode is a small component that acts as a one-way electrical valve, converting AC power from your wall into the DC power the magnetron needs. When a diode fails, it usually shorts out. The symptom is often distinct: the microwave will run, but you might hear a low-pitched "hum" that sounds strained, or notice a burning rubber smell.
● Why This Fails: Diodes degrade from heat cycling, power surges, and age. When they fail, they either become an "open circuit" (blocking all current) or a "short circuit" (allowing current both directions). Both prevent the magnetron from receiving proper power.
● The Symptom: Your microwave runs for 10 seconds, then makes a loud buzzing or humming sound, and either stops or smells like burning plastic. The food is ice cold.
Why Standard Multimeters Fail Here Testing a High Voltage Diode is tricky because a standard digital multimeter cannot produce enough voltage to open the diode's gate. If you use a standard resistance test, it will show "Open" (Infinity) in both directions, which leads many people to think the part is bad when it is actually fine.
The 9-Volt Battery Method To test it properly, you need to trick the diode with external voltage. What You Need:
● A fresh 9V battery
● A multimeter set to DC Volts mode
● The high-voltage diode (disconnected from the microwave)
1. Tape the 9V battery to your workbench.
2. Connect one terminal of the diode to the positive (+) terminal of the 9V battery using a short wire.
3. Set your multimeter to DC Volts mode.
4. Direction A: Touch the multimeter's negative probe to the other terminal of the diode, and the positive probe to the battery's negative terminal. You should see a voltage reading (usually around 4 to 6 volts) because the diode is conducting.
5. Direction B: Reverse the diode connection (flip it around). Now the multimeter should read 0 volts, because it is blocking the current.
6. Result: If you get current in both directions (voltage in both orientations) or no current in either direction (zero volts both ways), the diode is defective.
Replacement Cost: $10-20. This is an inexpensive fix if the diode is indeed the culprit. Visual Check (Quick Method): Before testing, look at the diode visually. If it's split in half, charred, or has burn marks, it's definitely dead.
If everything else checks out, you are looking at a failure of the main engine. The Magnetron is the vacuum tube that actually creates the microwave frequency. When it fails, the symptoms are hard to miss. A dying magnetron often produces a loud, angry, buzzing growl—much louder than the normal operation sound. You might also see visible cracks in the circular magnets or a burned, melted antenna tip.
● The Symptom: The microwave runs, makes an angry loud buzzing or humming noise (not the normal quiet hum), and produces no heat. Or it works for a few seconds, then stops abruptly.
● Why It Fails: Magnetrons have a finite lifespan (typically 7-10 years of normal use). They can also fail if the high-voltage circuit is unstable, if the capacitor is bad, or if the diode shorts out, sending surges through the magnetron.
Magnetron Replacement Reality Check Unlike the cheap diode or door switch, the magnetron is an expensive part ($100-200) and requires significant skill to replace.
● Beryllium Warning: We generally advise against DIY magnetron replacement for one critical reason: the ceramic insulators inside the magnetron often contain Beryllium Oxide. If you accidentally crack or crush this ceramic during removal, the dust is highly toxic if inhaled. It can cause chronic beryllium disease, a severe lung condition. Professional technicians have proper ventilation and training for this hazard.
High Voltage Capacitor The High Voltage Capacitor works alongside the diode. If the capacitor fails, the microwave might run intermittently or make a loud humming noise before blowing the main fuse.
● Why It Fails: Capacitors age and degrade from heat cycling. Power surges can damage the internal dielectric material. A failed capacitor stores insufficient charge, preventing the magnetron from receiving adequate power.
● The Symptom: The microwave intermittently heats and stops. Or it makes a loud, strained humming sound, then cuts off.
● Testing: Like the diode, capacitor testing requires specialized equipment. If you suspect this is the issue, call a professional.
The "Built-In" Reality Check: Expensive Repair? One of the most common questions we see on forums like Reddit is: "I have an expensive built-in microwave that spins but won't heat. Is it worth fixing?"
● If you have a $50 countertop microwave: A bad magnetron is a death sentence—the part costs more than a new unit. The labor alone is often $100-150 if you hire someone. Replacement is the smart choice.
● If you have a Built-In or Over-the-Range model: The math changes drastically. These units often cost $400 to $800 to replace, not including the nightmare of re-installation, mounting brackets, electrical rewiring, and matching the trim kit to your cabinets. A professional installation adds another $200-400 in labor.
● In this scenario: Replacing a $150 magnetron or a $20 diode is almost always the smarter financial move. However, because this involves pulling the heavy unit out of the wall and dealing with high voltage, this is the exact moment to call a professional service. The cost of professional removal and reinstallation is typically $300-500, still cheaper than a full replacement with installation.
If all the mechanical and electrical components test good, but the microwave still won't heat, the problem may lie in the control board itself—the "brain" of the low-voltage system.
● How This Happens: The control board contains small electrolytic capacitors, relays, and solder joints. Over time, these components can fail:
● Electrolytic Capacitors Fail: These capacitors store the small voltages needed by the logic circuits. If they age or are damaged by power surges, the board can't send the "Fire" signal to the magnetron relay.
● Relay or Triac Fails: These components act as electronic switches that turn the high-voltage circuit on. If they don't engage, the magnetron never receives power.
● Cold Solder Joints: Vibration and heat cycling can crack solder joints at heavy components. The circuit looks connected but has tiny air gaps that break the connection.
● The Symptom: Everything tests good—switches pass continuity, fuses are intact, diode looks fine, capacitor is good. But the microwave still runs without heating. The display works perfectly; the turntable spins; the fan runs. But the relay doesn't "click" when you press Start, or the relay clicks but the high-voltage circuit never powers on.
● Visual Clue: If you listen closely when you press Start, you should hear a soft "click" sound as the relay engages. If there's no click, or if the click happens but the heating never starts, the control board is likely the culprit.
● Professional Testing: Control board diagnosis requires a technician with specialized equipment to test voltage outputs, measure relay resistance, inspect for burnt components, and run diagnostic cycles.
● Replacement Cost: $150-300 for the board plus labor ($100-150 for installation). For most countertop units, this is approaching the cost of replacement, so the decision becomes financial.
While most microwaves use the same internal tech, certain brands have specific quirks and failure points.
Samsung (SE Error) Samsung units are notorious for the "SE" or "5E" error codes, but for heating issues, look closely at the keypad ribbon cable. We often find that the connection between the keypad and the control board oxidizes, causing the "Start" signal to fail even if the timer counts down.
● The Fix: If you see an SE error and the microwave runs but doesn't heat, the keypad ribbon is likely corroded. The solution is cleaning the ribbon connector with isopropyl alcohol or replacing it entirely. This is a $30-50 fix if you're handy; $150+ if you hire someone.
● Another Samsung Issue: Samsung door latches are prone to breaking. The plastic latch mechanism wears down quickly, preventing the micro-switches from engaging. If the door feels "loose" or requires excessive force to close, a new latch is needed ($50-80).
GE (Thermostat) If you own a GE Profile or Spacemaker, the High Voltage Thermostat is your likely enemy. On many GE models, this specific thermostat is located deep inside the unit, often behind the vent grille.
● The Function: This component is a temperature-sensing switch that monitors the heat of the high-voltage transformer. If it loses continuity due to age or corrosion, it cuts power to the magnetron as a safety measure—even if the transformer isn't actually overheating.
● The Symptom: The microwave runs for 10-20 seconds, then stops abruptly. The display shows no error, but cooking never completes. This repeats every time you try.
● The Fix: Testing requires multimeter access to the thermostat inside the unit. If it shows no continuity when it should, replacement is needed ($30-50 for the part, $100-150 for labor).
Whirlpool (Door Latch) Whirlpool (and KitchenAid) models are prone to Door Switch Misalignment. The plastic latch mechanism on these doors tends to wear down faster than other brands. If the door feels "loose," you likely have a primary switch failure.
● The Symptom: The door closes but feels like it could open easily. The interior light stays on even with the door closed. Or the light flickers when you gently push the door.
● The Fix: Inspect the latch hooks inside the door frame. If they're worn smooth or cracked, the switches won't engage. Replacement latches cost $40-70 and take 20 minutes to swap. This is one of the best DIY fixes for Whirlpool owners because access is easy and the part is inexpensive.
LG Microwave Not Heating LG models are sensitive to diode failure. If your LG microwave runs but the food is cold, swap the diode first—it is an inexpensive part and the most likely culprit on LG units.
● Visual Check for LG: Look for LG's error codes. If you see a "GE" or "EE" code, it often points to sensor or control board issues. But for the "Runs But No Heat" problem specifically, the diode fails more often than other components.
Troubleshooting a microwave can be a rewarding DIY project if it's just a loose door latch or a tripped sensor. But when the problem involves testing high-voltage diodes, discharging capacitors, or replacing a magnetron, the risks often outweigh the rewards.
If you are located in Sacramento, Roseville, or the surrounding areas, you don't have to guess.
Fair Appliance Repair Service specializes in diagnosing these exact issues. We carry the specific diodes, switches, and fuses needed to get your microwave heating again in a single visit, saving you the cost and hassle of a full replacement.
1. Safety Equipment: Professional technicians have high-voltage testing equipment and proper capacitor discharge tools.
2. Warranty Protection: Many parts carry manufacturer warranties only if installed by certified technicians.
3. Diagnostic Accuracy: A professional can isolate the problem in 30 minutes, whereas DIY testing often takes hours and guesswork.
This indicates a failure in the high-voltage circuit. While the low-voltage parts (light, turntable, fan) are receiving power, the magnetron is not. The most common causes are a failed high-voltage diode, a broken door interlock switch, or a blown thermal fuse.
For standard countertop models over 5 years old, replacement is usually more cost-effective. However, for built-in units or high-end brands (like Viking or Bosch), repair is recommended. Replacing a door switch or diode is significantly cheaper than buying and installing a new built-in unit.
There is no dedicated physical "reset" button on most microwaves. The "Hard Reset" is performed by unplugging the unit from the power outlet for at least 5 minutes. This discharges the control board capacitors and clears temporary logic errors.
If the unit is producing absolutely no heat, check the "Demo Mode" first. If that is off, the issue is internal. If the unit produces some heat but is very weak (takes 5 minutes to warm coffee), the Magnetron tube is likely nearing the end of its lifespan and losing efficiency.
We generally advise against DIY magnetron replacement for two reasons: First, the beryllium oxide ceramic insulators inside the magnetron can be toxic if cracked or broken. Second, the risk of high-voltage shock from the capacitor is severe. This is a repair best left to certified technicians.
The 6 steps are: 1) Unplug unit, 2) Wear rubber gloves/shoes, 3) Use insulated pliers, 4) Touch pliers to both terminals, 5) Listen for the POP, 6) Retest to verify discharge.
A loud hum usually indicates a shorted high-voltage diode or a failing magnetron. The hum is the sound of the transformer straining against the short circuit.
Unplug the unit, remove the control panel, identify the switch assembly, and test each switch for continuity. Replace any switch that does not show continuity when the button is pressed.


