Blog

Quick answer: unplug the fridge, find the condenser coils (behind the bottom front kickplate on most newer fridges, on the back panel on older ones), vacuum the loose dust with a crevice attachment, then work a coil brush gently between the fins — always in the direction of the fins. The whole job takes about 15 minutes. The U.S. Department of Energy notes that dirty coils force the compressor to work harder and can raise operating costs significantly. Below: exactly where the coils are on your brand, what to do if you don't have a coil brush, and how often Sacramento homes need this.
Your refrigerator doesn't "make cold" — it moves heat. The compressor pumps refrigerant through the condenser coils, and those coils release the heat pulled from inside the cabinet into your kitchen. That only works if air can flow across the coil surface.
When dust, pet hair, and kitchen grease mat over the coils, they act like a blanket. The heat has nowhere to go, so the compressor runs longer and hotter to do the same job. Three things follow from that:
Your energy bill goes up. The U.S. Department of Energy has documented that dirty coils measurably increase operating costs — the fridge is already one of the few appliances running 24/7, so even a percentage bump compounds every month.
The compressor ages faster. Compressors are designed for cycling — run, rest, run. A dust-choked condenser keeps the compressor running near-continuously at higher temperatures, which breaks down the lubricant and windings years ahead of schedule. A compressor replacement runs $700–$1,250 in Sacramento; the brush that prevents it costs about $12.
Cooling gets inconsistent. Long before a full failure, you'll see soft symptoms: milk spoiling a few days early, ice cream that's never quite hard, the fridge section drifting warm on hot afternoons.
We see the end stage of this on service calls every summer. A meaningful share of "my fridge died" calls in July and August turn out to be heat-stressed units with coils that hadn't been touched in years — and some of those compressors were savable a season earlier.
This is the question we get most on service calls — the location varies by brand and age. Here is what we see in Sacramento homes:

Not sure? Your model number is on a sticker inside the fridge door frame — search it with "condenser coil location," or check the owner's manual.
This is the easy layout. Kneel at the front of the fridge and look at the grille at floor level — that's the kickplate. On most Whirlpool-family models it snaps off: grip both ends and pull straight toward you. Shine a flashlight in and you'll see the coil-and-fin assembly, usually with the condenser fan behind it. Everything is reachable from the front; you don't need to move the fridge at all. This is a true 15-minute job.
Samsung and LG put the condenser at the bottom rear, behind a screwed-on cardboard or metal panel. That means pulling the refrigerator out from the wall — walk it forward corner by corner, watch the water line and power cord, and lay down cardboard if you have hardwood. Remove the panel screws (usually 1/4" hex or Phillips), and the coils and fan are right there. Budget 30 minutes instead of 15. This layout is exactly why so many Samsung and LG units we service have never had a cleaning — if moving the fridge isn't realistic for you, fold coil cleaning into a maintenance visit instead of skipping it for years.
Fridges from the 1990s and earlier often have a black tube grid covering the whole back wall. These are the easiest to clean — pull the unit forward and brush/vacuum the exposed grid — but be gentle: the tubes are soft copper or steel and bend easily.
GE states that most of its models manufactured since 2001 use a NeverClean™ condenser that is sealed and does not require owner cleaning. If your manual says NeverClean or you can't see any coils behind the kickplate, don't dismantle anything. Just vacuum the floor area and keep the base vents unobstructed — that's all GE expects you to do.
The standard kit: a long coil brush (~27", flexible), a vacuum with a crevice attachment, a microfiber cloth, and a flathead screwdriver for the kickplate. Total cost under $20 if you're buying the brush.
No coil brush? Here's what actually works — and what doesn't:
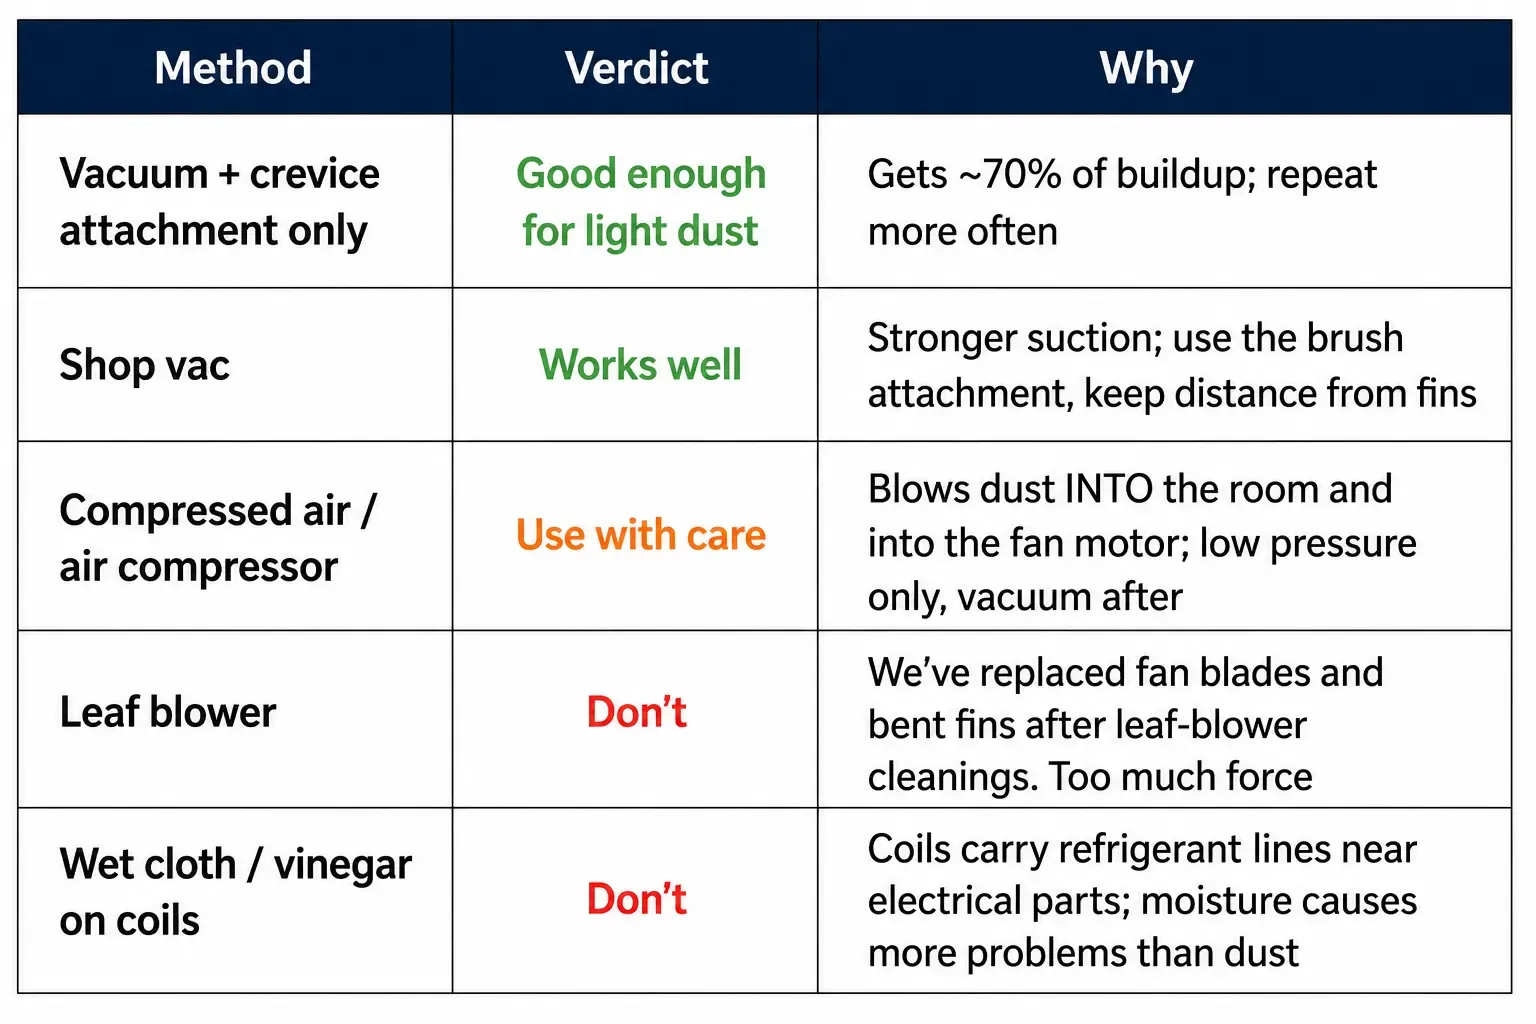
Vinegar is fine for wiping the kickplate and the floor area — just not the coils themselves.
• Disconnect the power. Unplug the fridge or flip the breaker. No exceptions — the condenser fan can kick on while your hand is inside.
• Open the access point. Bottom-front coils: pop or unscrew the kickplate. Rear coils: pull the fridge forward slowly (protect wood/tile floors) and remove the back panel screws.
• Vacuum first. Crevice attachment, outside-in, lifting the loose dust, pet hair, and crumbs before you brush. Brushing first just packs debris deeper.
• Brush between the fins. Work the coil brush gently between fins and tubing. Always brush in the direction of the fins — going across them bends the fins and chokes airflow, the opposite of what you want.
• Alternate brush and vacuum until the airflow paths look clear.
• Wash the kickplate in the sink with warm water and dish soap. Dry it fully before snapping it back.
• Wipe the surrounding floor and wall, reassemble, push the fridge back, restore power.
Within a few hours a clean system usually runs noticeably quieter, with shorter cycles.
Two details people miss:
The condenser fan. While you're in there, look at the fan blades (bottom-access models). They collect a fuzz coat that unbalances the blade and makes the fridge hum louder. Wipe the blades with a dry cloth — power off, never spin the blade with the vacuum.
The floor under the fridge. Dust on the floor gets pulled straight back into the coils within weeks. Vacuum and wipe the recess before you push the fridge back — it roughly doubles the time before the next cleaning is due.
The garage line matters here more than in most cities. Sacramento garages regularly pass 110°F in July–August, and a garage fridge with dusty coils is the single most common "fridge died in a heatwave" call we get. The compressor is already fighting the ambient heat; insulating it with a dust blanket finishes it off.
One more local angle: if you're on SMUD's Time-of-Day rate plan, an overworked compressor pulls its extra power right through the 5–8 p.m. peak window — so dirty coils cost you at the most expensive hours of the day. SMUD's appliance efficiency tips include coil cleaning for exactly this reason.
This deserves its own section because it drives so many of our summer calls. A second fridge or freezer in the garage lives in a fundamentally different environment than a kitchen unit:
The combination — maximum heat stress plus maximum dust plus zero attention — is why garage units fail disproportionately in heatwaves. If you keep one: clean its coils every 3–4 months from May through September, leave a few inches of clearance on all sides, and don't push it tight into a hot corner near the water heater. A $15 timer-reminder habit will realistically add years to a garage unit's life.
The honest reason most coils never get cleaned is that nobody remembers. Tie it to something you already do twice a year — daylight saving time changes work well for most of our customers ("clocks change, coils get cleaned"). Pet owners and garage-fridge owners: add one extra cleaning each summer, around Memorial Day, before the real heat arrives.
A 5-year-old French-door we serviced in Natomas last spring was running nonstop and the owner assumed the compressor was dying. The coils were carpeted in golden retriever hair. Fifteen minutes of cleaning, no parts, problem solved — that's the best-case version of this story, and it's common.
If the fridge still runs constantly after a cleaning, check that it has 2–3 inches of clearance at the back and sides, and that the kickplate is back on (it channels the airflow). If it's not cold enough, verify the settings — about 37–38°F for the fridge, 0°F for the freezer — and check the door seals. Our refrigerator temperature guide covers the right setting for every zone, and if the noise is the issue, start with why your refrigerator is making noise.
But if the back panel is extremely hot, you hear grinding or clicking, or the fridge keeps running flat-out after a thorough cleaning — that's a condenser fan or compressor issue, not a dust issue. Stop troubleshooting at that point; running it that way cooks the compressor.
Call a technician if the fridge is too heavy to move safely, you can't locate or access the coils, the unit still struggles after cleaning, or you're seeing the hot-panel/grinding symptoms above. A compressor that fails from chronic overheating is a $700+ repair — a maintenance visit is a fraction of that.
If you've done the cleaning and the fridge is still running hot, loud, or warm, the problem is past DIY. Fair Appliance Repair Service handles refrigerator repair in Sacramento with same-day appointments, upfront pricing, and a free diagnostic with completed repair — serving Sacramento, Natomas, Elk Grove, Citrus Heights, Roseville, and surrounding communities.
Fair Appliance Repair Service
341 Rick Heinrich Cir, Sacramento, CA 95835
📞 (916) 333-8388 · Book online
Find Us On Google Maps: https://www.google.com/maps?cid=7027228233403408814
Sayed Sajadi is the owner and lead technician of Fair Appliance Repair Service. He has completed over 4,000 appliance repairs across Sacramento County since 2020.
Q1: How do I clean refrigerator coils without a brush?
A vacuum with a crevice attachment removes most loose dust and pet hair on its own — work outside-in and take your time. A shop vac with a brush attachment works even better. Skip the leaf blower and high-pressure air; both can bend fins and damage the condenser fan.
Q2: Where are the coils on a Whirlpool refrigerator?
On most modern Whirlpool, Maytag, and KitchenAid models, the condenser coils are at the bottom front, behind the snap-off kickplate. Whirlpool's own guidance recommends cleaning them with a coil brush and vacuum, more often if you have pets.
Q3: Where are the coils on Samsung and LG refrigerators?
Usually at the bottom rear. You'll need to pull the unit out and remove a screwed-on back panel — which is why many Samsung/LG owners never clean them. If moving the fridge isn't practical for you, that's a fair reason to book a maintenance visit instead.
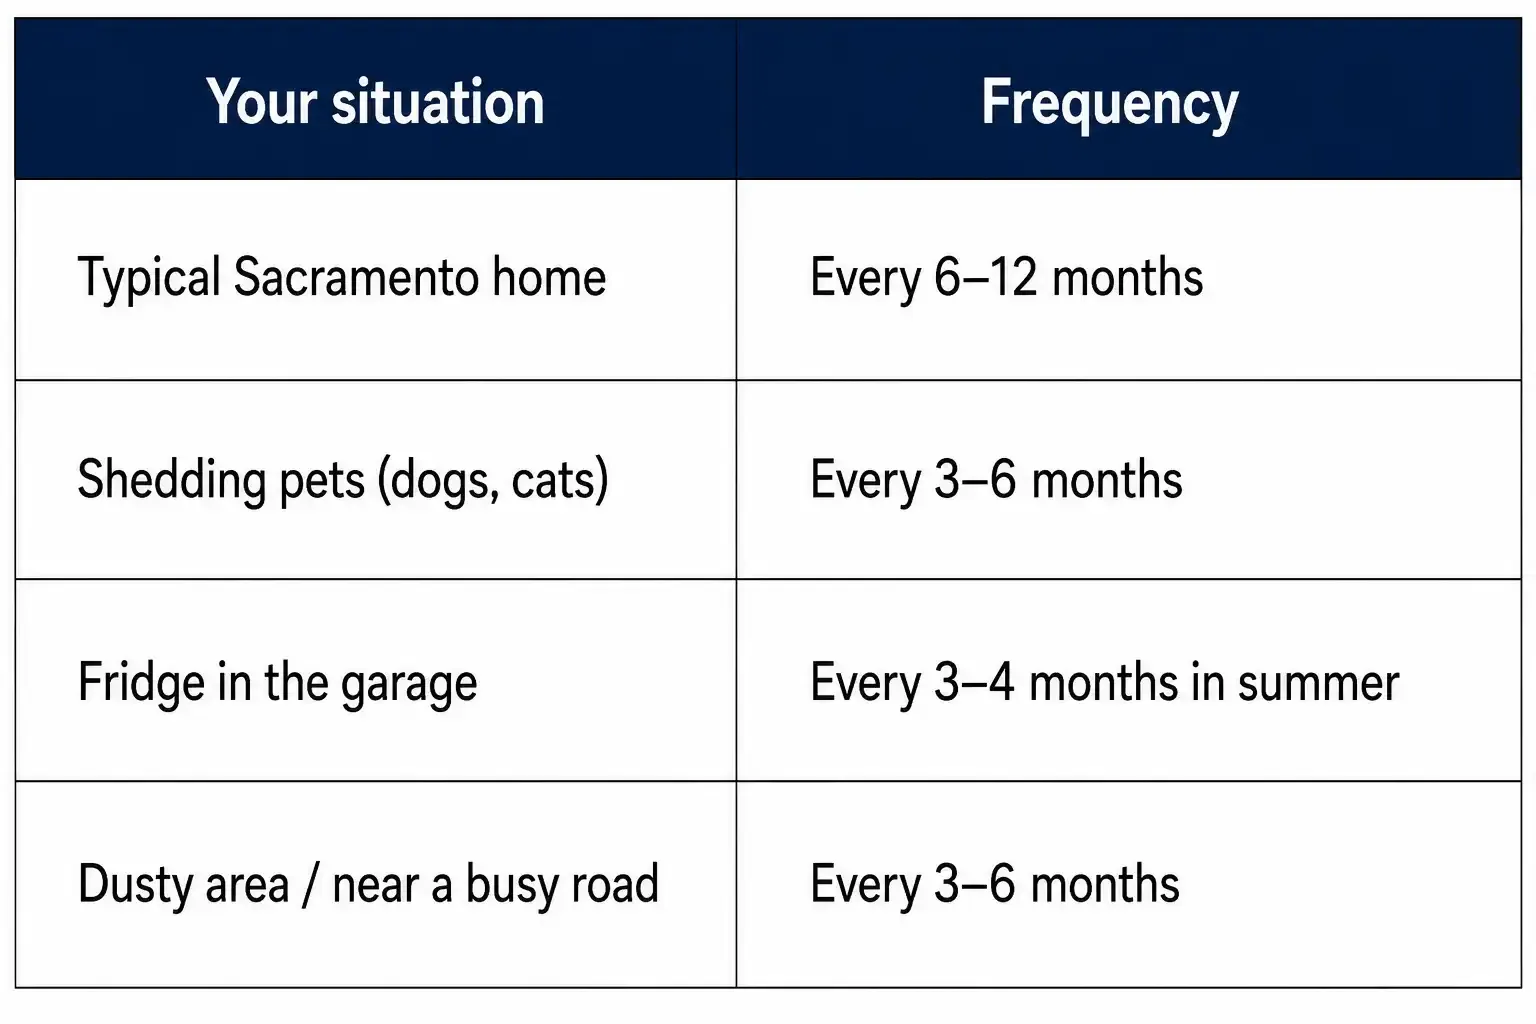
Q4: How often should refrigerator coils be cleaned?
Every 6–12 months for a typical home, every 3–6 months with shedding pets, and every 3–4 months for a garage fridge in Sacramento's summer heat.
Q5: Can I clean refrigerator coils with vinegar?
Use vinegar only on the removable kickplate and surrounding floor — never on the coils. The coil area houses the condenser fan and electrical components; the job needs dry tools: brush and vacuum.
Q6: Do dirty coils really raise the electric bill?
Yes. The Department of Energy reports dirty coils make the refrigerator work measurably harder, raising energy use and shortening compressor life. On SMUD's Time-of-Day plan, that waste lands in peak-rate hours.
Q7: What if my GE fridge has no visible coils?
Most GE models made after 2001 use a sealed NeverClean™ condenser that doesn't require owner cleaning. Keep the base vents clear and vacuum the floor area — don't open sealed panels.
Q8: Is it safe to clean the coils myself?
Yes, as long as the power is disconnected first and you brush gently in the direction of the fins. The two real DIY risks are bent fins (from cross-brushing or high-pressure air) and strained backs (from wrestling a 300 lb unit on rear-access models). If either worries you, book a maintenance visit instead.
Q9: How long does it take for the fridge to improve after cleaning?
Usually within a few hours. You'll typically notice shorter run cycles and less noise the same day. If nothing changes within 24 hours — it still runs constantly or the cabinet sides stay hot — the problem isn't dust, and it's worth a diagnostic before summer heat compounds it.
Q10: Do coils need a special cleaner or spray?
No. Dry cleaning — brush plus vacuum — is what manufacturers recommend. Foaming coil cleaners exist for HVAC condensers, but on a refrigerator the overspray reaches the fan motor and wiring; we don't recommend them for homeowners.


