Blog

Whirlpool Refrigerator Not Making Ice? Fix It Now
Imagine it’s a scorching Sacramento summer day. You reach for a cold drink, press the ice dispenser and nothing happens. No cubes, no crushed ice, just disappointment. If your Whirlpool refrigerator isn’t making ice, you’re not alone. Ice maker problems are among the top refrigerator repair calls in Sacramento. The good news? Many issues are simple to troubleshoot before calling in a technician.
This guide covers:
• Why your Whirlpool refrigerator stops making ice
• Step-by-step DIY fixes for common problems
• Advanced troubleshooting tips for compressors, valves, and modules
• When to call a professional repair service in Sacramento
• Preventive maintenance to keep ice flowing year-round
• By the end, you’ll know exactly what to check, what you can fix, and when expert help is the smarter option.
Why Your Whirlpool Refrigerator Stops Making Ice
Most Whirlpool ice maker problems come down to a handful of causes. Here is a breakdown of the most common ones and what to do about each.
1. Clogged or Old Water Filter
Water filters trap sediment and impurities over time. After about 6 months of use, they restrict water flow enough that the ice tray cannot fill properly.
Fix: Replace the filter with a Whirlpool-approved model, then flush 2 to 3 gallons of water through the dispenser to clear any air from the line.
2. Freezer Temperature Too High or Too Low
Ice requires a steady 0°F (-18°C) to form correctly. Above 10°F, the ice maker may slow down or stop entirely. Below -5°F, cubes clump together in the bin and can jam the ejector arm.
Fix: Set your thermostat to 0°F and verify the actual temperature with a standalone thermometer, since the built-in display is not always accurate.
3. Ice Maker Power Switch or Shut-Off Arm
This sounds obvious, but it is the single most common reason a Whirlpool ice maker suddenly stops working. The on/off switch is usually located directly on the ice maker unit itself or just behind the ice bucket. It is easy to bump accidentally when you reach for ice.
Fix: Before assuming a mechanical failure, check the basics. The on/off switch on the ice maker unit is easy to bump accidentally.
Also check the metal shut-off arm — if it is stuck in the raised position, the ice maker thinks the bin is full and stops producing, even when the bin is empty. Push the arm gently to the down position and clear any ice chunks holding it up.
4. Clogged Water Inlet Valve or Low Water Pressure
The inlet valve controls water flow into the ice tray and requires at least 20 psi of water pressure to open. Mineral buildup, a failed solenoid, or a kinked supply line behind the fridge can all cut off water completely.
Fix: Pull the fridge forward and check the supply line for sharp bends. If the line looks fine, test pressure using the bucket method: disconnect the line, run it into a bucket for 10 seconds, and check the volume.
A weak trickle means pressure is too low. If pressure is good but the ice maker still gets no water, the inlet valve solenoid has likely failed and needs replacement.
5. Frozen Fill Tube
The small plastic tube that delivers water into the ice tray can freeze solid, especially if the freezer runs too cold or water pressure is low and water drips slowly instead of filling in one quick burst.
Fix: How to Clear a Frozen Refrigerator Fill Tube? To clear it, use a hair dryer on the lowest heat setting, held 4 to 6 inches away, and move it slowly along the tube until the blockage clears. If the tube freezes repeatedly, lower the freezer temperature slightly or have the inlet valve checked for slow drip leaks. Plastic components in this area can warp at temperatures above 140°F, which will cause permanent damage requiring a parts replacement or you can purchase new or used refrigerator.
6. Ice Bin Misalignment or Dirty Ice Level Sensor
Many Whirlpool models use an infrared sensor to detect how full the bin is. If the bin is even slightly out of position, the sensor reads it as full and stops production.
Fix: Pull the bin all the way out, wipe the two small sensor lenses on the inside walls with a dry cotton swab, and push the bin firmly back in until it clicks into place.
7. Ice Jams in the Bin or Dispenser Chute
Many Whirlpool models use an infrared sensor system to detect how much ice is in the bin. If the bin is even slightly out of position, the sensor does not align correctly and the ice maker interprets this as a full bin and stops producing
Fix: Use a plastic spatula or wooden spoon to break up clumps never use metal tools, which can damage the tray or chute liner. Empty and dry the bin completely before replacing it to prevent the next clump from forming.
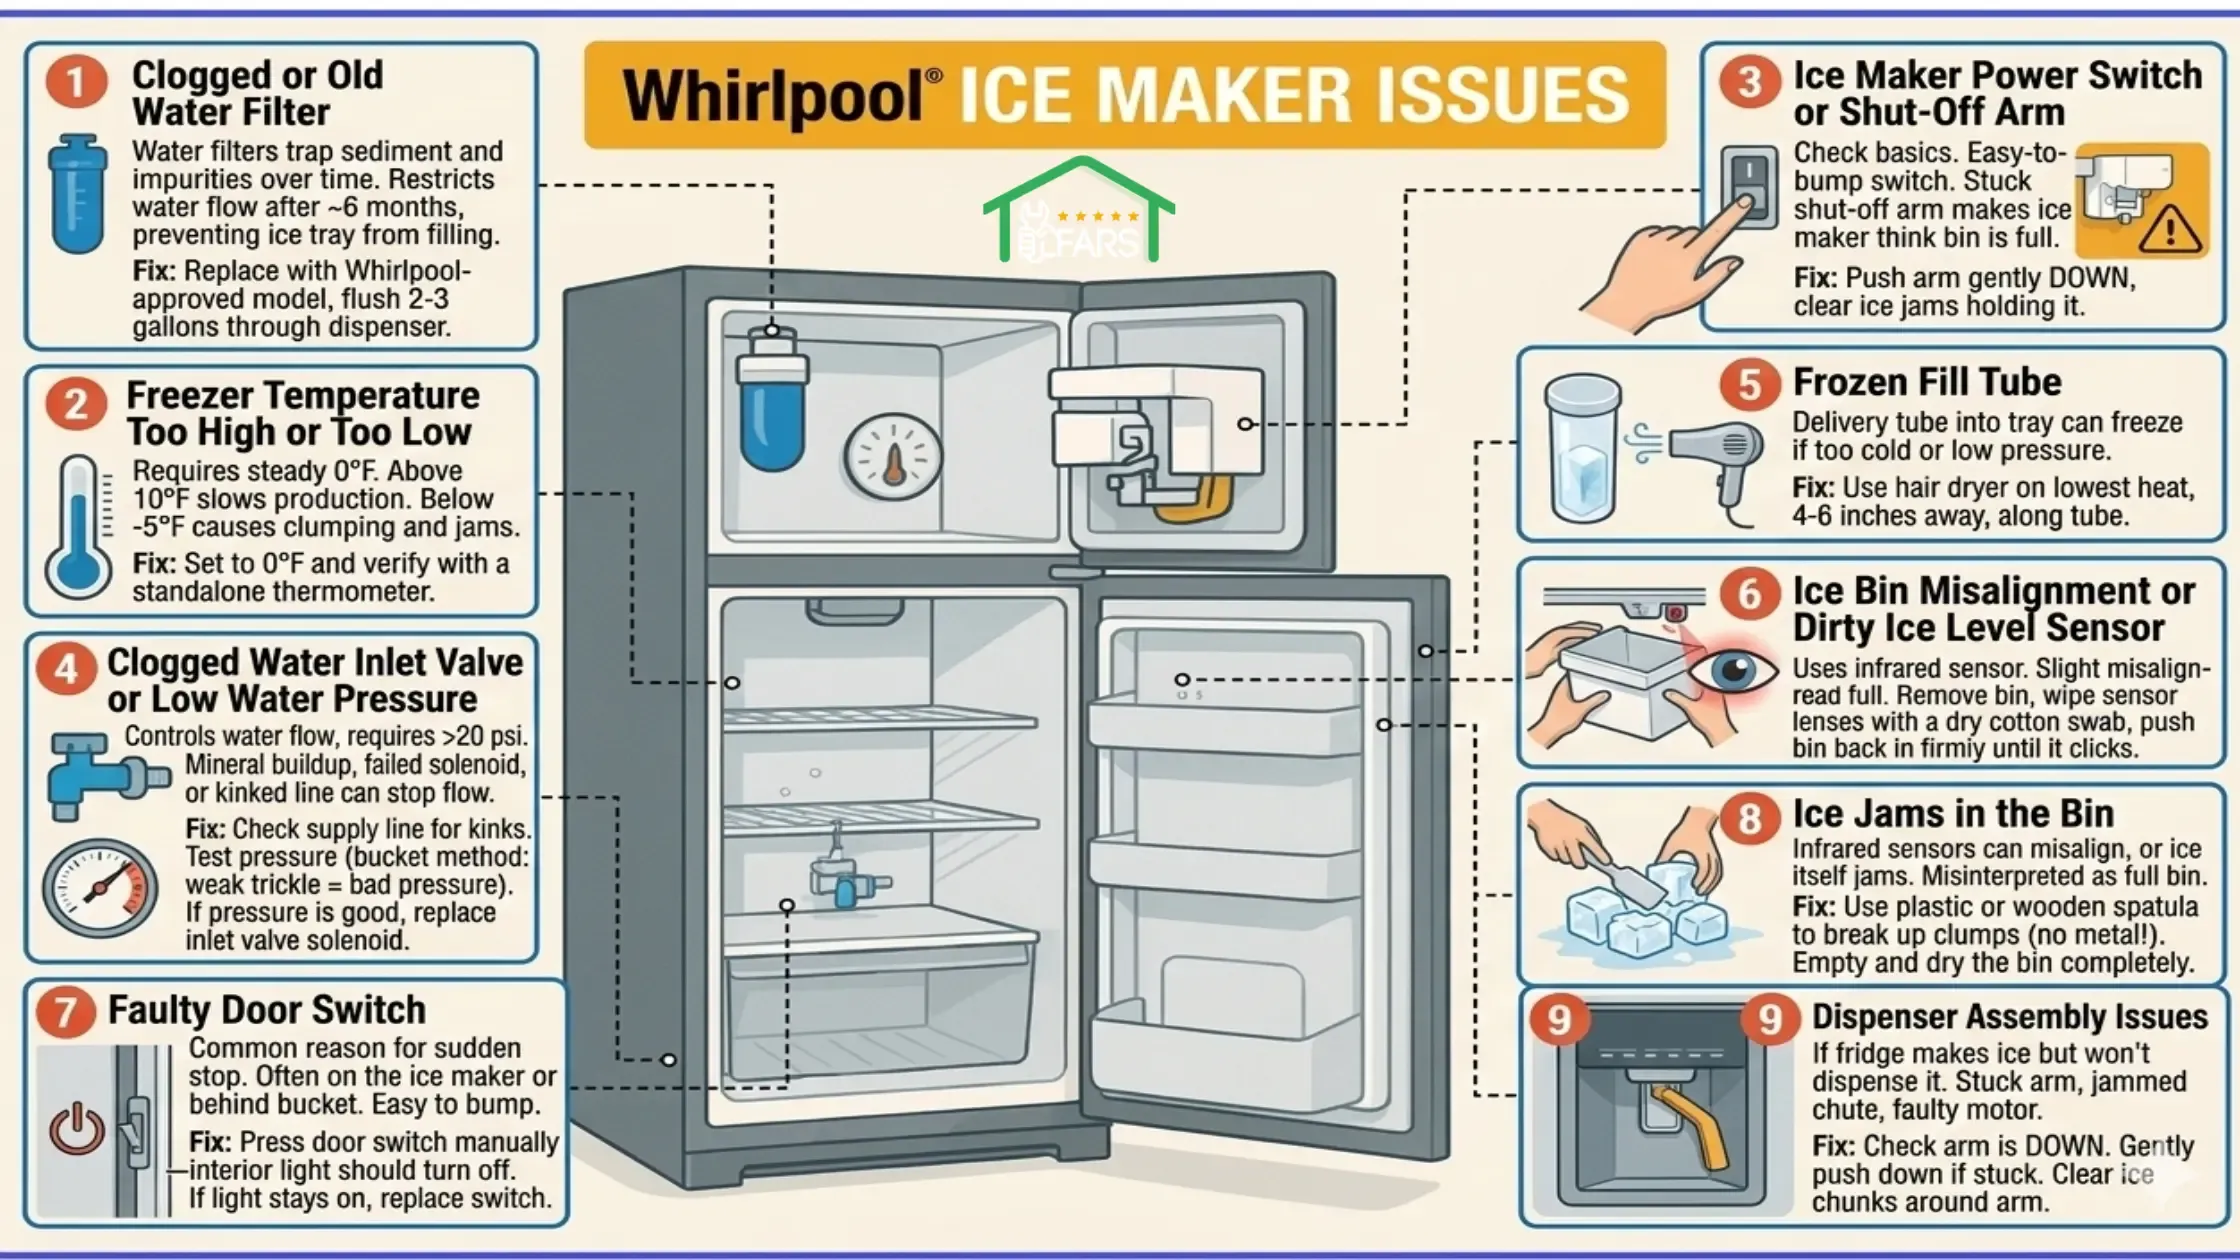
8. Dispenser Assembly Issues
If your fridge is making ice but not dispensing it, the problem is likely mechanical rather than a cooling issue. A stuck dispenser arm, a jammed chute, or a faulty dispenser motor can all stop ice from reaching your glass even when the bin is full.
Fix:
• Check that the arm is in the DOWN position.
• If it is stuck up, gently push it down. If it springs back up on its own, the arm itself may be damaged or bent.
• Clear any ice chunks around the arm that may be holding it up.
9. Faulty Door Switch
If the refrigerator thinks the door is open, the ice maker will not run.
Fix: Press the door switch manually; the interior light should turn off when you press it. If the light stays on, the switch has failed and needs replacement. It is typically a $10 to $25 part.
Whirlpool Gold Series Ice Maker Fixes
The Gold Series has some unique quirks.
Faulty Ice Module → Replace if cracked/damaged.
Frozen Fill Tube → Defrost with warm water.
Sensor Malfunction → Clean or replace the bin sensor.
Control Board Issues → Look for burnt marks or failed relays.
Is Your Refrigerator Level? It Matters More Than You Think
A refrigerator that is not level creates ice maker problems that are almost impossible to diagnose without checking this first. When the fridge tilts forward or to one side, water fills the ice tray unevenly. One side of the tray gets too much water while the other stays nearly empty. The result is oddly shaped cubes, partial fills, or cubes that stick in the tray and jam the ejector arm during harvest.
Uneven leveling also prevents meltwater from draining correctly through the defrost drain, which can cause water to pool in the ice bin area and freeze into a solid block over time.
How to Check and Adjust Refrigerator Level
Place a small bubble level on the top of the refrigerator, first front-to-back and then side-to-side.
The fridge should be perfectly level side-to-side. Front-to-back, a very slight backward tilt (about a quarter inch lower at the back) is actually ideal — it helps the doors swing closed on their own and allows the defrost drain to flow toward the back.
To adjust, locate the leveling feet at the bottom front corners of the fridge. Turn them clockwise to raise that corner and counter-clockwise to lower it.
Some models also have rear wheels that can be adjusted. Check your owner's manual if the front feet alone do not bring the unit into level.
Recheck level after each adjustment before pushing the fridge back against the wall.
Pro Tip: After leveling, run a full ice production cycle (give it 24 hours) and check whether cubes are filling the tray evenly. Evenly shaped, fully formed cubes confirm the water distribution is now balanced.
How to Reset Your Whirlpool Ice Maker: Every Method, Step by Step
Resetting the ice maker clears electronic errors, restarts the harvest cycle, and is often the fastest way to get ice production going again after fixing an underlying issue. Whirlpool models use different reset methods depending on the series and year of manufacture. Here is every method, in order from simplest to most involved.
Method 1: The Reset Button
Many Whirlpool ice makers have a dedicated reset button on the unit itself, typically located on the front face, the bottom edge, or the side panel of the ice maker module.
• Remove the ice bin and set it aside.
• Locate the TEST / RESET button on the ice maker unit.
• Press and hold the button for 5 to 10 seconds.
You should hear the ice maker begin a harvest cycle a motor will run, the ejector arm will rotate, and water should fill the tray within a minute or two.
Replace the ice bin and allow 24 hours for a full bin of ice to accumulate.
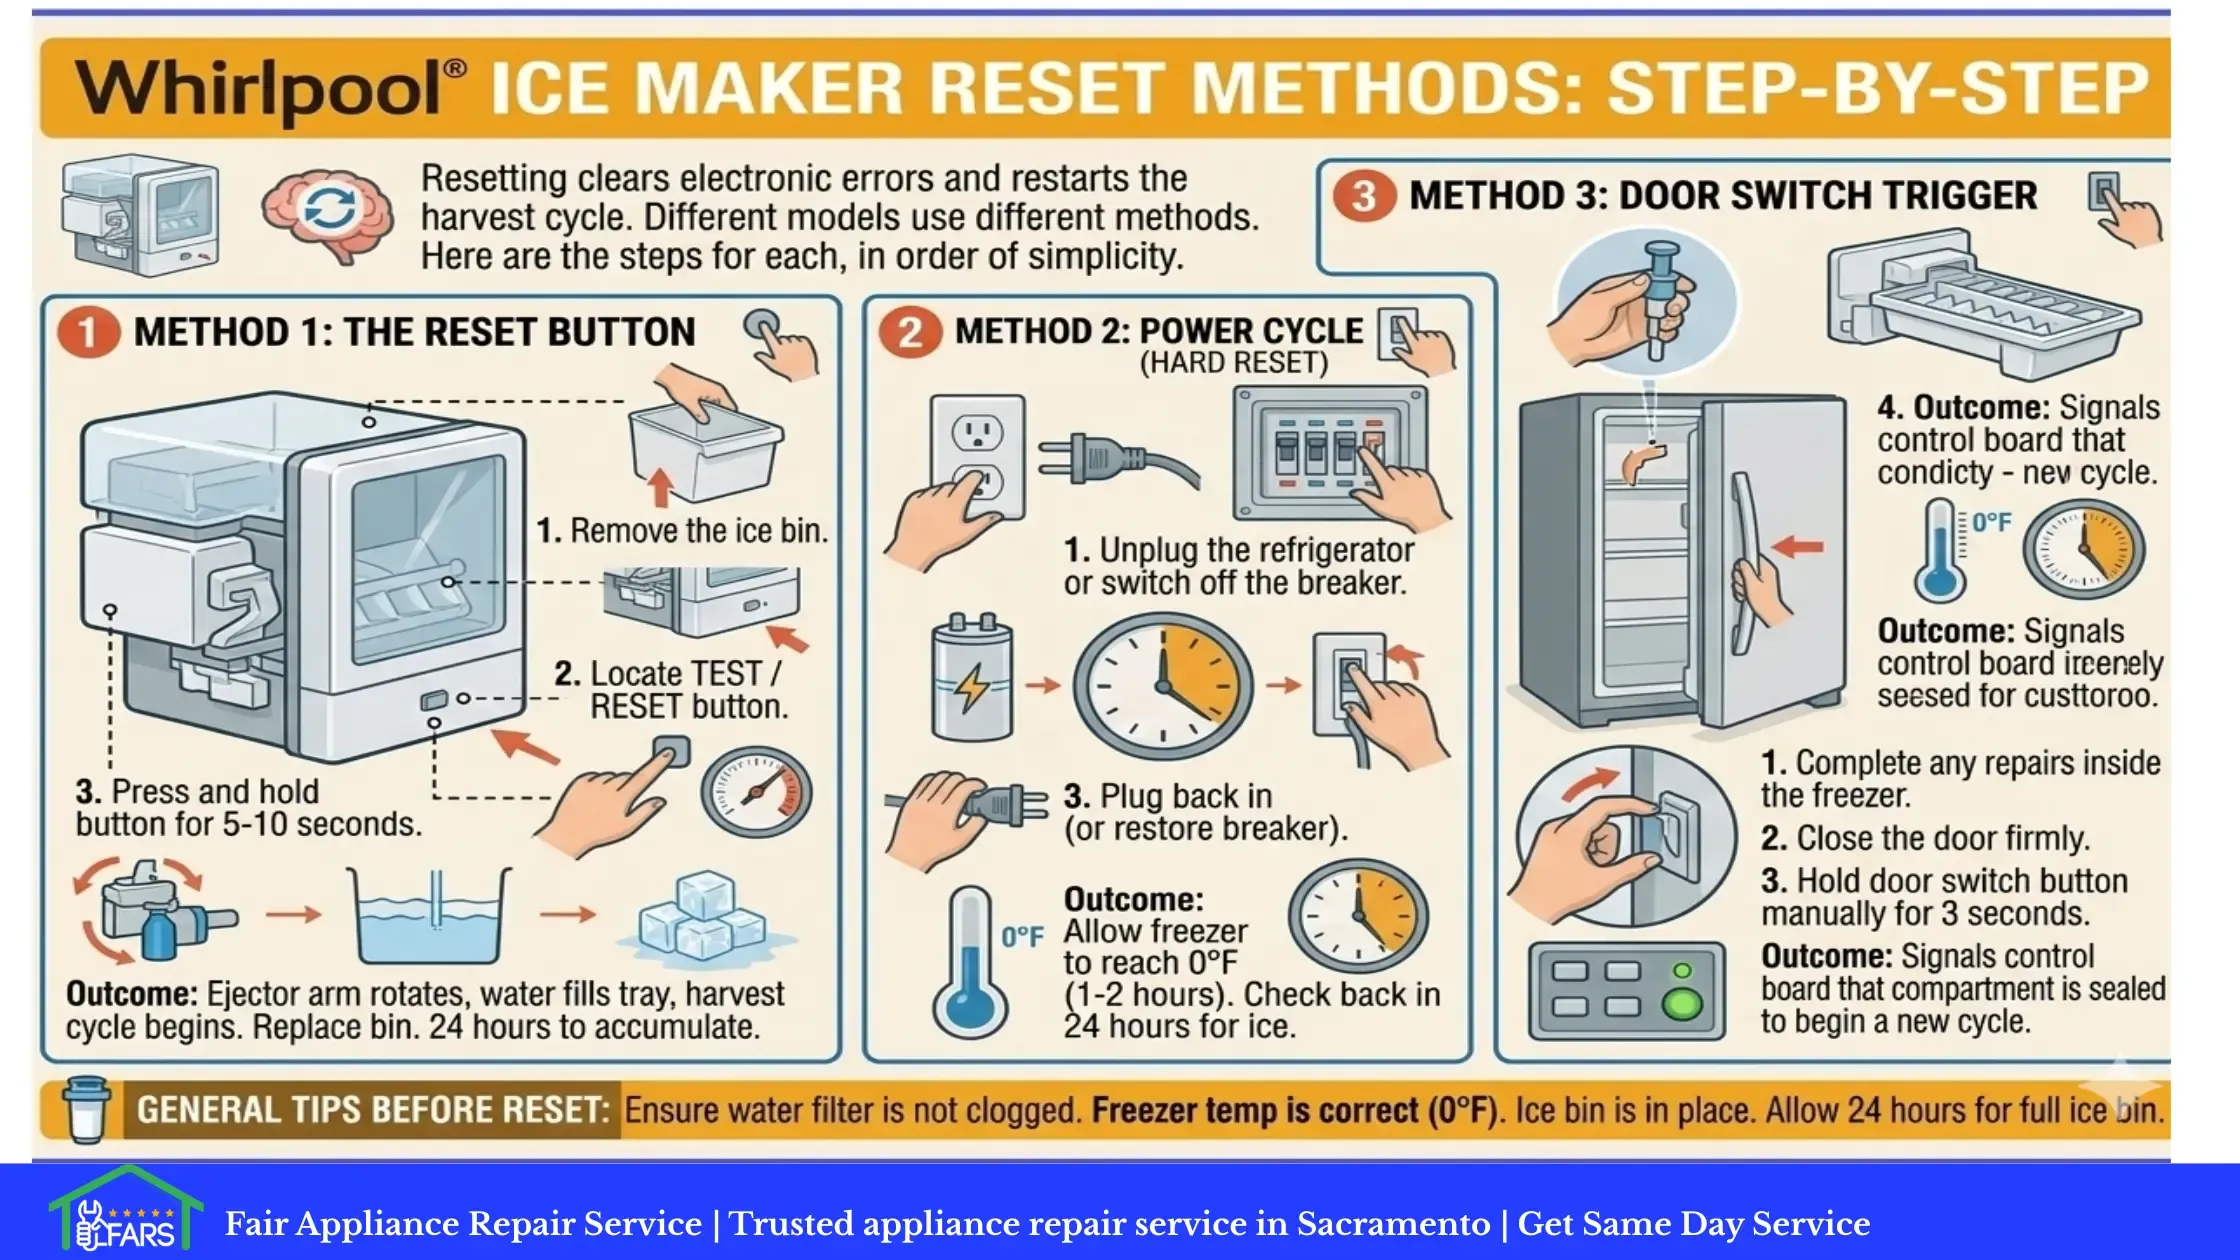
Method 2: Power Cycle (Hard Reset)
If your model does not have a reset button, a power cycle clears the control board's memory and forces it to restart fresh. This is also the right method after any electrical repair or sensor replacement.
• Unplug the refrigerator from the wall outlet or switch off the circuit breaker for that outlet.
• Wait a full 5 minutes. Waiting less than 2 minutes may not fully discharge the control board's capacitors.
• Plug back in (or restore the breaker).
• Allow the freezer to return to 0°F before expecting ice production to resume. This typically takes 1 to 2 hours after a power cycle.
• Once at temperature, close the freezer door firmly and check back in 24 hours for ice.
Method 3: Door Switch Trigger (Twist-Tray Models)
Some older Whirlpool twist-tray models initiate a new harvest cycle when they detect the freezer door has been closed after being open.
After completing any repair inside the freezer, close the door firmly and hold the door switch button manually for 3 seconds.
This signals the control board that the compartment is sealed and ready to begin a new cycle.
Pro Tip: How to Enter Whirlpool Diagnostic Mode
If you want to know exactly what your refrigerator is thinking, you can skip the guesswork by entering Service Diagnostic Mode. This allows the refrigerator to run a self-test on the ice maker motor, the water inlet valve, and the sensors.
How to Enter Diagnostic Mode (Most Modern Models):
Locate the Main UI: This is usually the touch panel on the front of the door.
The Combination: Press and hold SW1 and SW2 (typically the first two buttons on the left, such as Door Alarm and Freezer Temperature) simultaneously for 3 to 5 seconds.
The Signal: Release the buttons when you hear a beep and see the display change to show numbers or "01."
Navigating: Use the temperature +/- buttons to scroll through "Service Tests."
Test 45: This is the specific test for the Ice Maker Water Fill. If you run this and no water enters the tray, your inlet valve has failed.
Test 57: This runs a Harvest Test to see if the motor can physically rotate the ice tray.
Exiting: Unplug the fridge for 10 seconds or wait 2 minutes for the system to time out and return to normal operation.
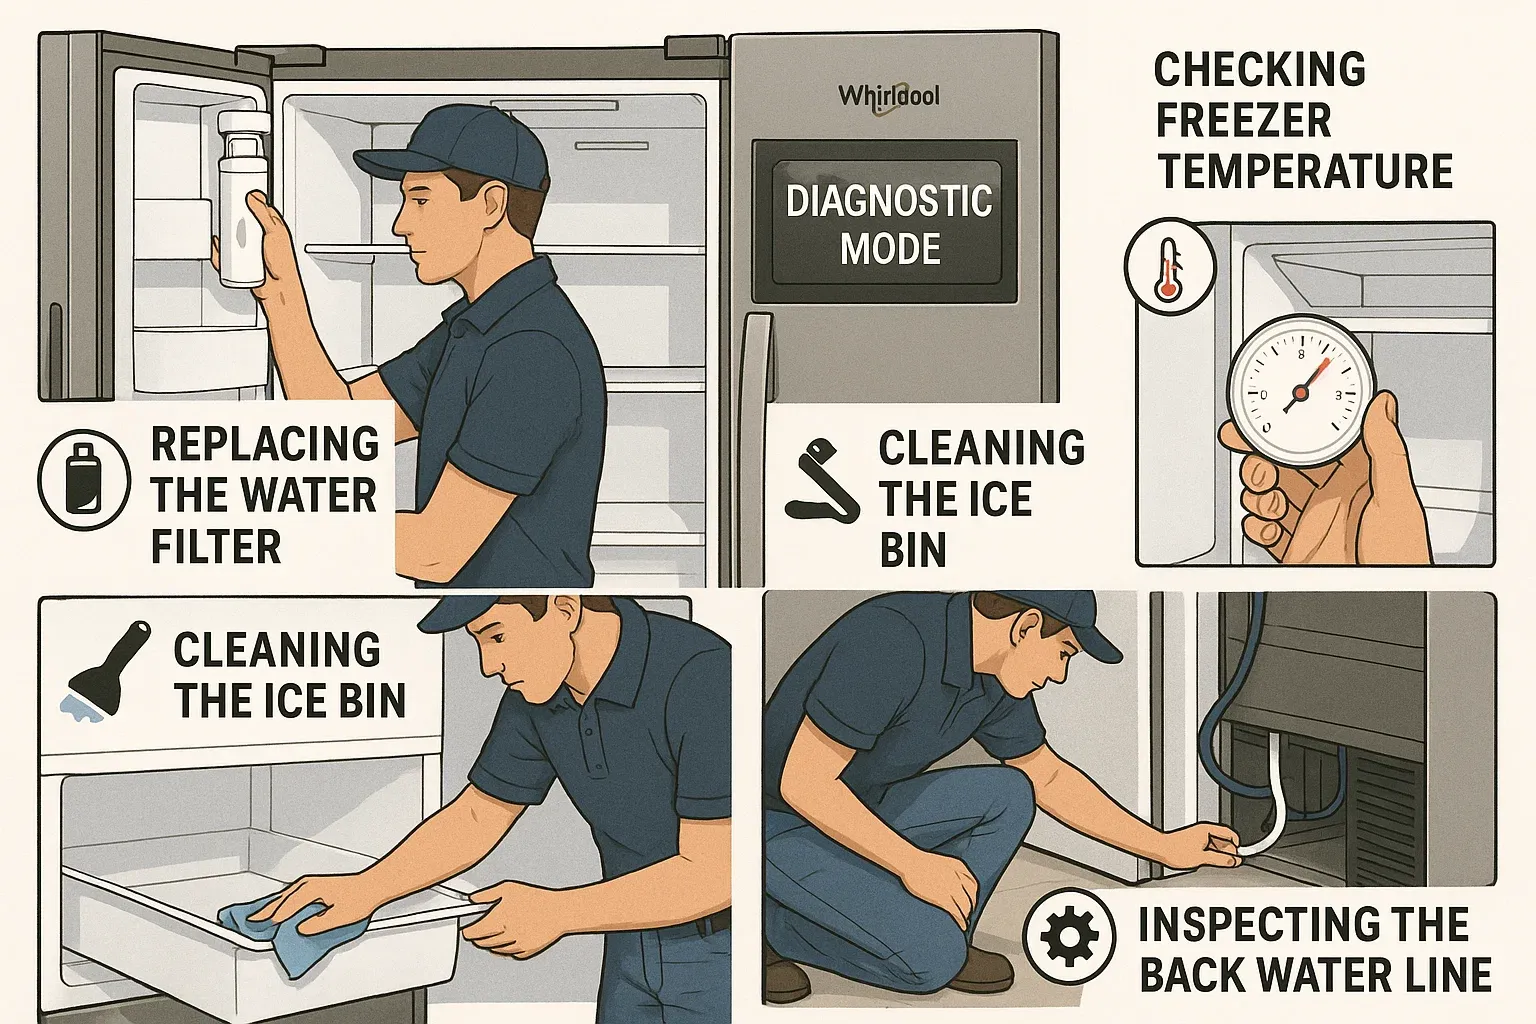
Preventive Maintenance for Whirlpool Ice Makers
• Replace filters every 6 months.
• Keep freezer at 0°F.
• Clean ice bin every 3 months.
• Inspect water line annually.
• Run Whirlpool’s diagnostic mode monthly.
DIY vs Professional Repair: Which is Right?
DIY If:
• Simple fix (filter, temperature, cleaning).
• You’re comfortable with tools.
Call a Pro If:
• Compressor issues.
• Control board failure.
• Recurring problems after DIY.
Sacramento’s Trusted Whirlpool Repair Experts
When DIY isn’t enough, Sacramento homeowners trust: Fair Appliance Repair Service, because-
• Awarded “Neighborhood Faves” 2022–2024.
• Free diagnostics with repair.
• Same/Next-day service.
• Transparent pricing, no hidden fees.
• 90 days–1 year warranty.
• Certified Whirlpool specialists.
Get Your Ice Back Fast
A Whirlpool refrigerator not making ice is frustrating but most fixes are simple: replace filters, adjust freezer temps, or clear blockages. For deeper issues like compressors or control boards, Sacramento’s Fair Appliance Repair Service delivers expert, warranty-backed solutions.
👉 Bottom line: Try the DIY basics. If still no ice, call the pros for fast, affordable Whirlpool Refrigerator repair in Sacramento.
📞 916-333-8388 | Same-day appointments available.
Frequently Asked Questions
Q1: Why is my Whirlpool fridge not making ice but the water dispenser works?
The dispenser and ice maker use different paths. A frozen fill tube, weak inlet valve, or a stuck ice-maker motor/ejector can stop ice while water still flows. Swap the filter, set the freezer to 0°F (-18°C), and check the fill tube for ice.
Q2: How do I reset a Whirlpool ice maker?
Open the ice maker cover and press the TEST/RESET button for 5–10 seconds (on twist-tray models), or power-cycle the fridge for 5 minutes and close the door switch to start a harvest cycle. If it won’t complete the cycle, Fair Appliance Repair Service can calibrate the module or replace a failing motor/control.
Q3: What freezer temperature is best for making ice?
Target 0°F (-18°C). Warmer than 10°F slows production; too cold can bridge/clump cubes. Verify with a standalone thermometer, clear vents, and inspect door gasket.
Q4: How do I know if the Whirlpool water inlet valve is bad?
Signs include no fill during the ice cycle, a constant hum with no water, or very low tray volume even with a new filter. Confirm house water pressure ≥ 20–60 psi; then the valve coils should show proper resistance on a meter.
Q5: Can a clogged filter stop my Whirlpool from making ice?
Yes. After about 6 months/200 gallons, flow drops and the tray won’t fill. Replace with the correct Whirlpool-spec filter, then flush 2–3 gallons to purge air. If ice still won't return after a filter change and air purge, the issue likely resides in a restricted water inlet valve or a failing ice maker module that requires professional diagnostic tools.
Q6: Why is my Whirlpool making ice slowly or cubes are clumping?
Common causes: freezer too cold, door openings letting in moisture, dirty ice bin sensor, or infrequent use. Set 0°F, empty/clean/dry the bin, and run a few batches. Persistent clumping or slow production points to airflow or control issues—Fair Appliance Repair Service can diagnose and fix fast with OEM parts.


