Blog

Most GE refrigerator problems trace back to one of a few parts: dirty condenser coils, a failed fan or start relay, a clogged water filter, or a defrost fault. A 5-minute power cycle and a temperature check fix roughly one in five complaints with no parts at all. This guide walks you through every symptom, the likely cause, and whether it's a DIY fix or a job for a technician.
TL;DR
• Start with a soft reset: unplug for 5 minutes, then confirm the fridge is set to 37°F and the freezer to 0°F. This clears many electronic glitches instantly.
• Cooling, ice, and water problems usually come down to a single failed part you can identify with the symptom chart below before you spend a dollar.
• Sealed-system, compressor, and control-board repairs need a certified tech. Call Fair Appliance Repair Service in Sacramento at (916) 333-8388 for same-day diagnosis with a 90 to 365-day warranty.
Before you diagnose anything, run these three checks. They solve a large share of GE refrigerator complaints without any repair.
Power cycle the unit. Unplug the refrigerator (or flip its breaker), wait a full 5 minutes, then restore power. This soft reset clears minor control-board errors that cause odd behavior when no hardware has actually failed.
Verify the settings. GE recommends 37°F for the fresh-food section and 0°F for the freezer. A power surge or a bumped panel often resets these, and a fridge set to its warmest number will look broken when it isn't.
Check the breathing room. Leave at least one inch of clearance on all sides. A unit shoved tight against a wall traps heat and forces the compressor to run nonstop. If the reset doesn't help, two overlooked settings are worth ruling out next.
A GE refrigerator that lights up but won't cool is often stuck in demo mode, not broken. Showroom or demo mode (sometimes shown as "OFF," "dEMO," or a code on the display) disables cooling so floor models don't run. To exit, the common method is to press and hold the freezer and refrigerator temperature buttons together for about 3 seconds until the display beeps; check your model's manual for the exact combo. This single setting fools a lot of homeowners into thinking the compressor died.
Power outages cause the other hidden fault. After a Sacramento PG&E outage, give the fridge up to 24 hours to return to temperature before assuming a part failed, and run the 5-minute reset if the panel is unresponsive. If neither demo mode nor a recent outage explains it, match your symptom to its cause below.
Use this chart to jump straight to the likely part. It's the fastest way to tell a free fix from a service call.
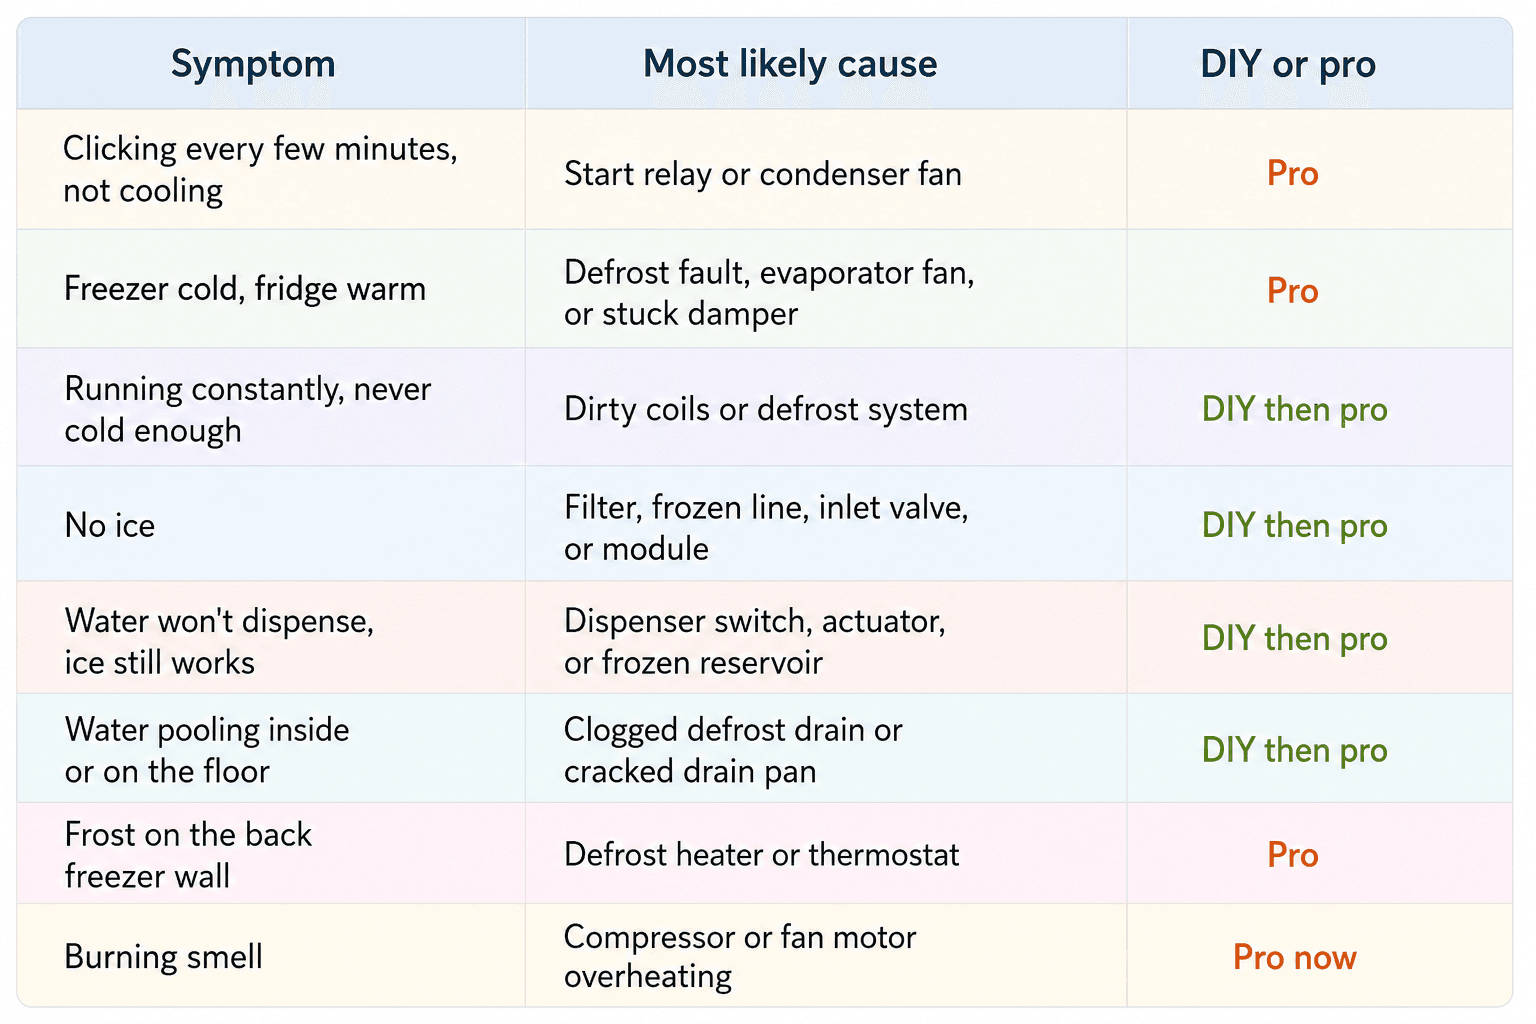
Once you know the suspect part, the repair process below tells you how to confirm it.
A reliable GE refrigerator repair follows a structured process to identify the real problem instead of replacing parts randomly.
Identify the exact symptom first:"Not cooling" and "freezer cold but fridge warm" usually indicate different failures.
Check power and settings: Verify the refrigerator has power and perform the reset procedure if needed.
Determine which system is affected:Cooling system (compressor, fans, defrost components)
Water system (filter, inlet valve, water lines):Electrical system (control board, switches, lights)
Test the suspected component:Use a multimeter to check continuity on parts such as thermostats, switches, and valves.
Repair or replace the failed part:Leave sealed-system repairs and high-voltage work to a professional technician.
Confirm the repair worked:Allow up to 24 hours for the refrigerator to return to normal operating temperature.
Avoid unnecessary part replacements:Incorrect diagnosis is one of the most expensive DIY mistakes.
Locate the model and serial number before ordering parts.
• The sticker is typically found:
• On the left interior wall
• Near the crisper drawers
• Behind the kick plate
Order the exact replacement part for your specific model:Matching the model number helps prevent compatibility issues.
Apply this same process to common failures:The next step is troubleshooting a refrigerator that is not cooling.
A GE refrigerator that runs but won't cool is almost always one of seven parts, listed here from the cheapest DIY check to the repair that needs a technician. For a parts-level look at how the cooling system fits together, see our guide on why a refrigerator stops cooling.
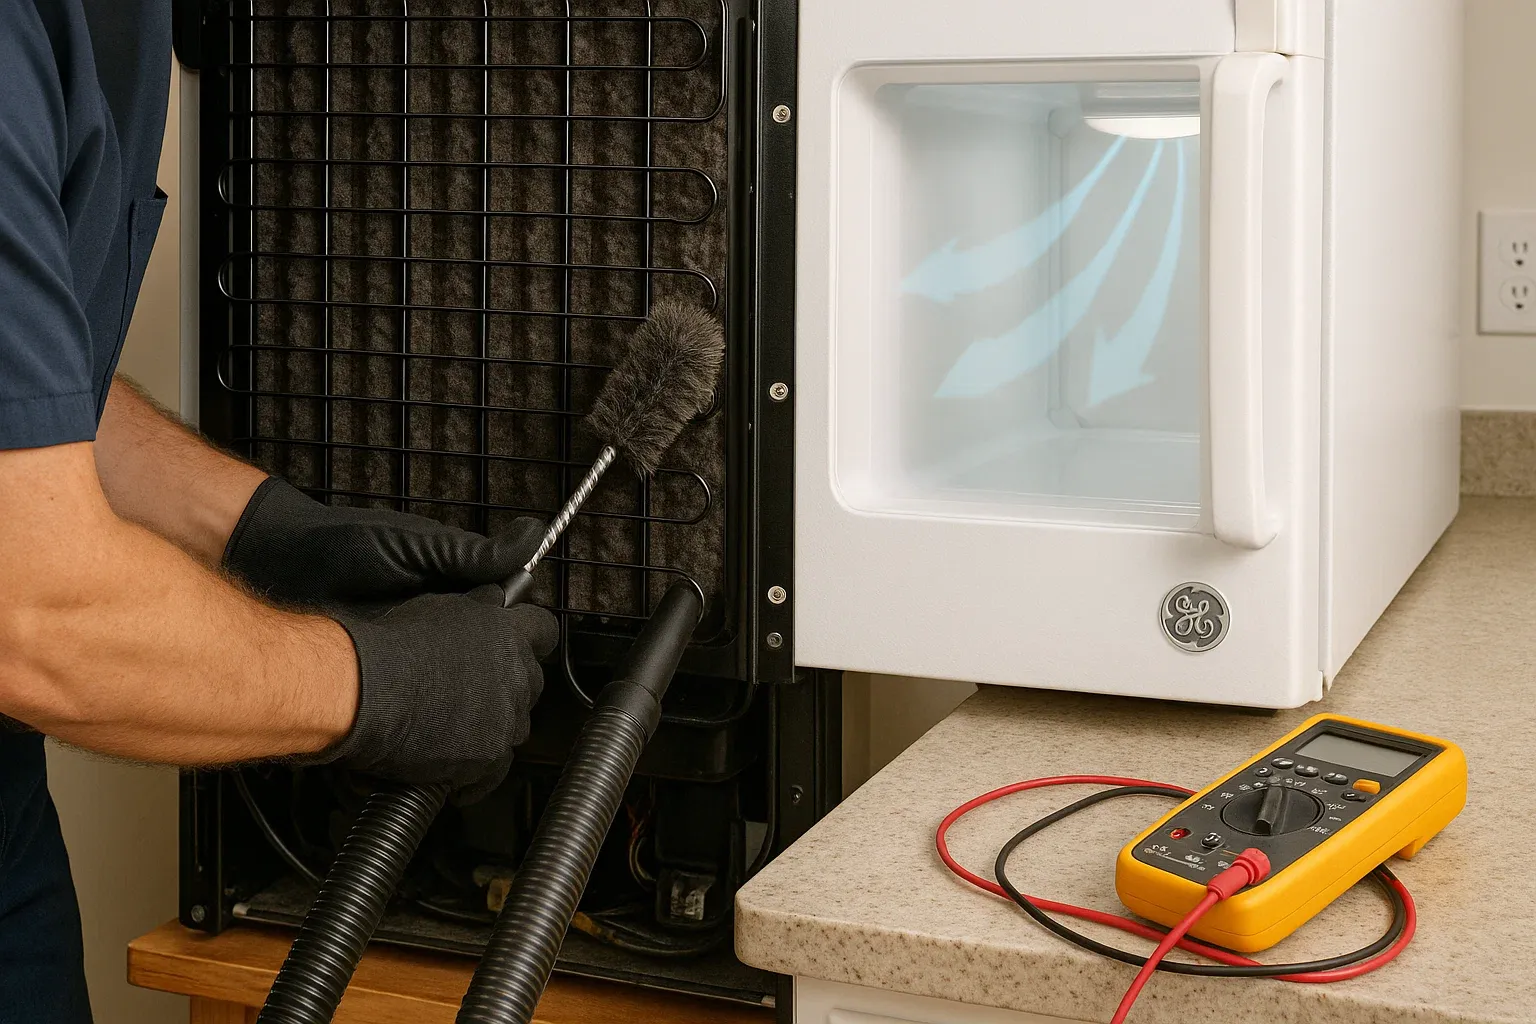
Dirty condenser coils. Dust and pet hair coat the coils and trap heat so the fridge can't cool. Unplug the unit, find the coils at the back or behind the bottom kick plate, and vacuum them with a coil brush. Do this every 6 to 12 months.
Condenser fan motor. This fan cools the coils. With the fridge running, listen at the lower back. Silence while the compressor runs points to a failed fan or debris jamming the blade.
Evaporator fan motor. Inside the freezer, this fan pushes cold air into both compartments. If it fails, the freezer stays cold but the fridge warms up. A grinding or clicking noise from the freezer is the tell.
Start relay. A clicking sound every few minutes followed by silence means the compressor is trying to start and failing. The start relay is a small, affordable part attached to the compressor, and it's one of the most common GE no-cool repairs.
Defrost system failure. A failed defrost heater, thermostat, or timer lets frost build on the evaporator coil until airflow stops. The sign is heavy frost on the back freezer wall plus a fridge that slowly warms. A technician tests all three parts to find the culprit.
Damper control. The damper meters cold air into the fridge. Stuck closed, the fridge stays warm; stuck open, producing freezes.
Main control board. On newer models the board manages cooling, defrost, and fans. Erratic temperatures with everything else checking out points here. If your fridge has the opposite problem, the fix is different.
These are two opposite faults with different causes. A freezer that won't freeze usually means a defrost fault or a dead evaporator fan, the same parts behind a warm fridge, and a fully dead freezer compartment may need dedicated freezer repair in Sacramento. Food freezing in the fresh-food section points the other way:
a damper stuck open or a failed thermistor telling the board the fridge is warmer than it really is. Test the thermistor for continuity before replacing anything. A fridge that never shuts off is a related warning sign worth checking next.
A GE refrigerator that runs nonstop is usually fighting dirty coils, a weak door seal, or a defrost problem. Start by cleaning the condenser coils and checking that the door gasket seals tight (close the door on a dollar bill; if it slides out easily, the seal is weak).
Constant running in a hot kitchen during Sacramento summers is also normal under load, but paired with rising temperatures it signals the defrost system or compressor. Cooling aside, the ice maker is the next most common GE complaint.
A GE ice maker that stops making ice comes down to temperature, water flow, or a failed part, in that order. Confirm the ice maker is switched on and the arm is down, and that the freezer sits between 0°F and 5°F (the ice mold has to reach about 16°F to cycle). Replace the water filter if it's older than six months, since a clogged filter chokes water flow (our water filter replacement guide walks through it).
Check the line behind the fridge for kinks or a frozen fill tube, and thaw any ice with a hair dryer on low. If water still won't reach the tray, the inlet valve is likely failing; valve replacement averages $150 to $200 installed. To reset, switch the ice maker off for 15 seconds, back on, and press the paddle three times. If ice works but water doesn't, look at the dispenser instead.
When the dispenser won't pour water but the ice maker still runs, the problem is on the dispenser side, not the main water supply. A working ice maker confirms you have water pressure, so check the parts unique to the dispenser. Replace a filter older than six months, then hold the paddle for two minutes to purge trapped air.
If the line behind or in the door is frozen, thaw it. If those don't work, the dispenser actuator, switch, or door switch has likely failed, and each can be tested with a multimeter. Leaks are a separate issue with its own short list of causes.
Most GE refrigerator leaks come from a clogged defrost drain or a cracked drain pan, both fixable without a technician. Flush the defrost drain at the back of the freezer floor with warm water and a teaspoon of baking soda. A cracked drain pan under the unit leaks onto the floor and runs $20 to $40 to replace. A few more quick diagnoses:
• Strange noises: clicking points to the relay or compressor, rattling to the condenser fan, and buzzing to the ice maker filling. Our noisy refrigerator troubleshooting guide breaks down each sound.
• Light not working: swap in a GE appliance bulb (not a household bulb), or check the door switch and, on Profile models, an "SA" code that flags a board communication fault.
• Door won't seal: clean the gasket with warm soapy water first, tilt the unit 1/4 inch higher in front so it self-closes, and check the closing cam.
• Bad smell: deep clean the interior, wash the drip pan, and clear the defrost drain. A burning smell is different: unplug the fridge and call a technician.
For electronic faults, GE built in a way to read the problem yourself.
Most GE refrigerators have a service mode that names the failed part for you. On many models, press and hold "Door Alarm" and "Temperature" for 3 seconds to enter.
Useful tests include T4 (thermistors, a "Fail" means a temperature sensor is bad), T8 (fans, a non-spinning fan means a dead motor), T11 (defrost heater, no sizzle means a failed heater or thermostat), and T12 (master reset, always try this before assuming the board failed).
To exit and clear codes, unplug the fridge for 30 seconds. If a code returns after that reset, it's a real component fault, which raises the repair-or-replace question
GE refrigerator repairs in the Sacramento area range from about $100 for a gasket to $1,500 for a sealed-system rebuild. These are typical installed costs.
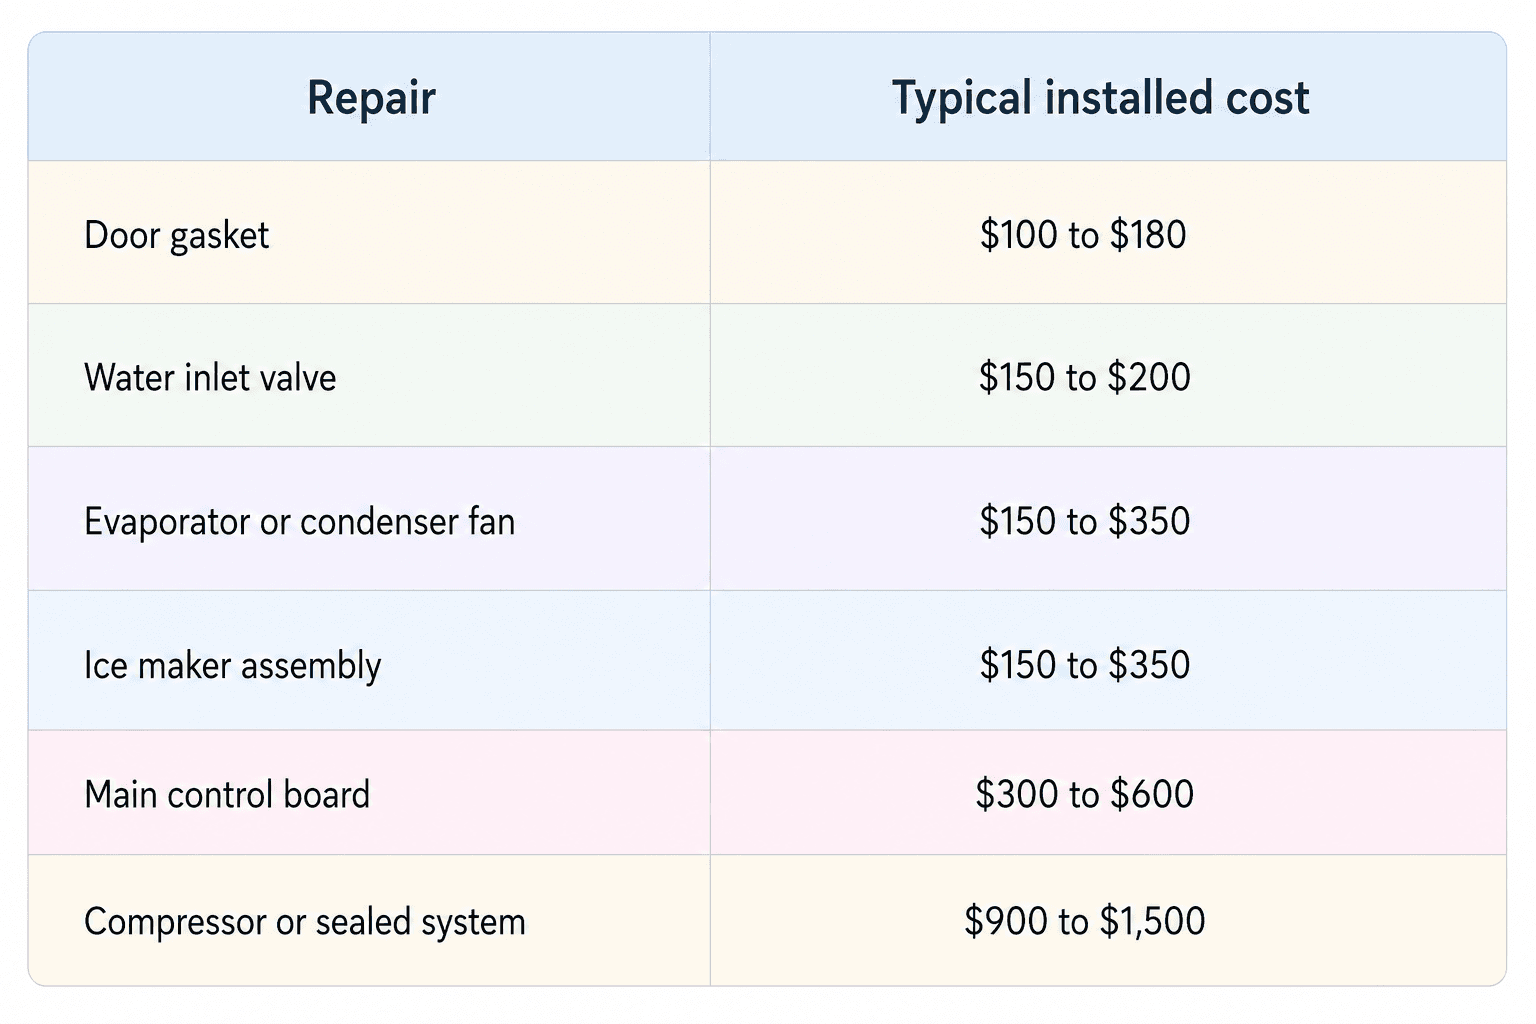
A simple rule decides repair versus replacement: if the repair costs less than half the price of a comparable new unit, fixing it almost always makes sense. GE refrigerators last 14 to 17 years with regular care, so a $250 fan on an 8-year-old fridge is worth it, while a $1,200 compressor on a 15-year-old unit usually isn't. Whatever you decide, know which jobs are safe to do yourself.
Cleaning coils, swapping a filter, clearing a drain, and replacing a gasket are safe DIY jobs. Stop and call a pro for compressor replacement, refrigerant recharging, control-board work, fan-motor replacement, inlet-valve replacement, and any sealed-system repair.
Refrigerant work is not optional to outsource: federal law requires EPA Section 608 certification to handle it. This guide covers all GE configurations, including Profile, Café, Monogram, French Door, side-by-side, and top and bottom-freezer models, though Monogram and sealed-system jobs almost always need brand-trained help. Local conditions also shape what fails first.
Sacramento's hard water and 100-degree summers put specific stress on GE refrigerators. Mineral-heavy tap water scales up inlet valves and fill tubes, which is why local ice-maker and dispenser failures often trace back to a clogged valve rather than a bad module. Summer heat forces compressors and condenser fans to run harder, so coil cleaning matters more here than in cooler climates.
Fair Appliance Repair Service, based at 341 Rick Heinrich Cir in Sacramento, handles all GE models with same-day scheduling, upfront pricing, and a 90 to 365-day warranty on every refrigerator repair. With a BBB A+ rating and Google Guaranteed accreditation, the team diagnoses the root cause the first time. Call (916) 333-8388 or schedule online. A little routine maintenance keeps these calls rare.
Five habits prevent most GE refrigerator breakdowns. Clean the condenser coils every 6 to 12 months, replace the water filter every 6 months, clean the door gaskets yearly with warm soapy water, keep the freezer at least 25% full to hold temperature, and check the leveling feet so the doors self-close and the compressor isn't strained.
To understand what each part does, read our explainer on your refrigerator's key components. When a fix is beyond DIY, book GE refrigerator repair in Sacramento or contact our team.
341 Rick Heinrich Cir, Sacramento, CA 95835, USA
Call (916) 333-8388 or schedule service online.
The usual causes are dirty condenser coils, a failed evaporator fan, or a defrost fault. Clean the coils first, then check whether the freezer is cold while the fridge stays warm, which points to defrost or a stuck damper.
A click every few minutes followed by silence means the compressor is trying to start and failing, usually a bad start relay. It's a common and affordable GE repair, but it needs a technician.
Cold air isn't reaching the fridge. The cause is a frost-blocked evaporator coil from a defrost failure, a dead evaporator fan, or a damper stuck closed. A technician can test all three quickly.
Unplug it (or flip the breaker) for 5 minutes, then restore power. To reset just the ice maker, switch it off for 15 seconds, back on, and press the dispenser paddle three times.
On many models, hold "Door Alarm" and "Temperature" together for 3 seconds. Run T12 for a master reset first, then T4, T8, and T11 to test sensors, fans, and the defrost heater.
Check that it's switched on with the arm down, the freezer is between 0°F and 5°F, and the filter is under six months old. A frozen line or failing inlet valve is the next suspect.
Simple repairs like a gasket run $100 to $200, mid-range fan and ice-maker jobs run $150 to $350, and major control-board or compressor work runs $300 to $1,500.
Yes, if the repair costs less than half the price of a new comparable unit. These fridges last 14 to 17 years, so most repairs on a unit under 10 years old pay off.
The fridge runs constantly without cooling, you hear repeated clicking, the back of the unit runs very hot, and your power bill climbs.
Reputable shops warranty parts and labor. Fair Appliance Repair Service backs every refrigerator repair with a 90 to 365-day warranty. Always confirm terms before approving work.
Clean the coils every 6 to 12 months, change the water filter every 6 months, check the gaskets yearly, and inspect the drain pan once a year.
Call Fair Appliance Repair Service at (916) 333-8388 for same-day GE refrigerator repair in Sacramento.


